Hey everyone!! I wanted to fill you guys in on a little family adventure were getting ready for. Were moving to Denver!!! :) My husband's job change is allowing us to pursue our dreams of living in The Mile High City! 300 plus days of sun per year with GORGEOUS snowy winters? Yes please! Were super excited to get out of Southern California and move to our dream location...or should I say...our dream U.S. location. If someone told me I could move to Italy I'm sure that would trump Denver. lol. If I'm a little on the flakey side with the blog for the next few weeks please forgive me. Two toddlers, a house full of stuff to pack, plans to make, deposits to pay (grr...why are they always so expensive), and plane tickets to buy (were flying instead of driving. Insert a very loud Praise the Lord!!)...and ALL in the next few weeks. our move date is August 4th so were gonna be busy bees for a little bit. Our area in CA is starting to get 100 degree temps...which will last until mid October...so you can imagine my excitement at getting out of here before we all boil to death! lol. I love you all! I would majorly appreciate prayer during this transition. Especially for my kiddos that aren't big fans of change. Wish us luck and I'll be posting some house pictures when we are in and settled!!! Hope you all had a fabulous weekend!
Helloo lovely readers!!! Just wanted to share a recently completed project with ya'll. My hubby and I were SO excited/confident after we built our Farm Table that we decided to tackle a rustic bookshelf. I was majorly inspired by this one. Check it out. (Our Vintage Home is a treasure trove of awesome DIY ideas! I was actually about to copy the same bookshelf from Restoration Hardware when I saw their version and I loved it SO much!!) We have a lot of books! Not like "hoarders"..but we like to read so we buy books. We have been relying on one small bookshelf for about a year now because...lets face it...bookshelves are expensive unless you go the rickety Ikea route. We wanted solid wood. I have two demolition derby toddlers and I want it to be sturdy!! Well I've been a busy bee accumulating pallet wood and various scrap wood lately and I was determined to build this bookshelf out of wood that I already owned. So I got to work during my kids nap (in 90 degree weather I might add) disassembling pallets to build the bookshelf. I spent two hours, got about 5 slivers, and sweated profusely before I realized that the wood I was getting off these pallets wasn't going to be strong enough...or straight enough...to build the shelf. FAIL. So off to home depot I went with my measurements in hand and supplies list to see if I could score some inexpensive wood. I knew I wanted to shelf to have a "planked" look rather than being super clean and perfect. I wanted it to look like I made it with nasty old barn wood. I ended up buying two 1/12's for the top and bottom shelves and as I was waiting at the wood cutting machine in Home Depot I was in EXTREMELY close proximity to the overflowing with awesome-sauce wood "cull lumber bin". Have you seen the cull bin? Get thee to HD or Lowes and scavenge like a vulture!! Seriously awesome wood to be had in those bins. And the best part is it is CHEAP! Like 50 cents a board cheap! They had just refilled the bin that day...and they had refilled it with RED CEDAR (yes I'm shouting!). And did I mention that the length of those beautiful boards was the exact length I needed? Yup pretty much awesome! It was thick too...and had beautiful imperfections that you just can't create easily (and to think that the imperfections that I was wanting was WHY it ended up in the cull bin to begin with...SCORE!)
So when I got home with all my supplies my hubby and I started building. I decided to splurge and use rebar for the backs of the shelves so the books didn't fall off. I love the industrial vibe it added. And we also got some super cute small metal casters for the bottom so we could move it easily.
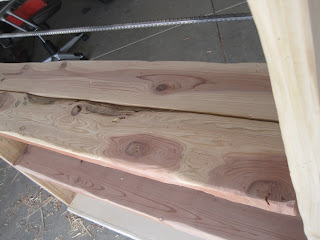
 This is a close up of the wood sans stain or poly. So pretty and unusual!
 Here's the shelf pretty much built with no stain and the rebar in place. If you want step by step instructions for putting this thing together go to Our Vintage Home's site...they did a great tutorial!
We were gonna use the pocket hole system that we used on our table but we just didn't have the energy and wanted it to look rustic so we opted to just put the screws in through the side and have them show. We used silver screws that matched the rebar so it actually looks intentional! Bonus! We adore this shelf. I haven't loaded it up yet because were moving and can't fathom lugging all my books out just to pack them up in a month and a half...but when we get settled you best believe that this shelf will be styled and loaded down with awesome books! Here's the finished product! What do you guys think???


 There ya have it! Custom built shelving to fit our needs and our budget! All in all this shelf cost me about 50 bucks to build. No joke! The restoration hardware version is like 2000!!! BAM! I'll take my version any day and I had a blast building it! So please...if you like this shelf do share. I would love to answer any questions you guys have! Oh and to finish it I used my new favey fave rust stain that I mentioned here. SO easy and makes wood look so fab! And I poly coated it with shellac a few times for protection. Done and done! :) Hope you guys have a FAB-U-LOUS weekend!
Linking with the following fab parties:


So when I got home with all my supplies my hubby and I started building. I decided to splurge and use rebar for the backs of the shelves so the books didn't fall off. I love the industrial vibe it added. And we also got some super cute small metal casters for the bottom so we could move it easily.


We were gonna use the pocket hole system that we used on our table but we just didn't have the energy and wanted it to look rustic so we opted to just put the screws in through the side and have them show. We used silver screws that matched the rebar so it actually looks intentional! Bonus! We adore this shelf. I haven't loaded it up yet because were moving and can't fathom lugging all my books out just to pack them up in a month and a half...but when we get settled you best believe that this shelf will be styled and loaded down with awesome books! Here's the finished product! What do you guys think???


Linking with the following fab parties:
I guess I should say, My hubby AND I built a farm table.
How is everyone? Me? I am GREAT! I have been a busy lady lately....as you could all probably assume since I have been MIA for a while. My son started pre-school...sniff sniff...he's SO big and LOVES it! He's truly blossoming and I couldn't be more proud! I also got my booty back in the gym and am feeling really great being more active. I also have been dreaming up a new project. I wanted to build a rustic, chunky farmhouse table. I wanted it to look like this....

So I turned to these plans on Ana White's website to give me a rough guide for how to build it myself. I did a lot of tweaking to the plans to accommodate for some materials that I already owned (several old reclaimed 4X4 posts that i wanted to use for legs) and we also opted to copy RH's table totally and notch out the outside boards on the top to show the legs.
So since I was using reclaimed lumber for my legs I really REALLY wanted to use reclaimed lumber for the top and aprons too. But for whatever reason NO ONE wants to GIVE AWAY 100 year old barn wood. What's wrong with people nowdays? I couldn't afford the barn wood I saw on Craigslist and I REALLY REALLY couldn't afford to do amazing old growth large planks from a cool lumber store near my house. So instead of breaking the bank MAJORLY I opted to head to Lowes and buy new lumber to make up the rest of the wood for the table. Douglas Fir to be exact. It came in to around 70 bucks for the wood. I bought (4) 2x10's for the top that I had the guy cut to 6ft long, (2) 2x2's that we cut at home to use as cross bracers, and (3) 2x4's to use for the aprons. MAJOR TIP: When you are in the lumber store buying your wood. Don't just grab boards off the rack and buy them. Lay them down on the ground...lay them next to each other...Do they match up? Do they have any bends or twists? Are they warped at all? Do they lay perfectly straight? You do NOT NOT NOT want crooked boards and its a HUGE pain in the booty to have to go back to the store when you are in building mode to buy new boards! I speak from personal experience....
Ok so after buying all the wood...cutting all the wood to the proper specs...laying it all out and making sure it matched up...I decided to assemble it in whatever way seemed like the best way. Nevermind the way Ana White...who does this ALL THE TIME...says to do it. I know better right? WRONG! My hubby and I basically assembled this table about 3 times. We did it once...realized that we put the legs on too soon and the aprons wouldn't fit properly...did it again with the aprons on too soon and then realized the cross bracers wouldn't fit properly. There was A LOT of that going on in my garage on building day! It was not fun and we each had about 40 splinters when it was all said and done! Here are a few pics of the table during the process...
This was us laying out the boards to make sure they matched up...see...NOT perfect...we ended up needing to recut a few.


I could show you a TON of other pics....but I'm impatient and want to get to the BIG REVEAL already!! If you want detailed pics of the process then go to Ana's site. She rocks!
Here we go....deep breath....


Here's another shot...

I seriously apologize that I've been neglecting you all lately. Pinkie promise that I'll do better!!! Hope you all have a fab weekend!!
Sharing this project at the following fab parties:
Coastal Charm


Hey awesome people! Sorry SO SORRY its been forever since I've posted. I have had...not only a severe creative drought...but also 4 people in my house with a severe virus. My son decided that starting preschool 3 weeks ago gave him the right to infect his whole family with the plague! The worst cold/fever/cough that has hit us in a while! Plus it turned into bronchitis and an ear infection for my son. Good times. Good times indeed. Anyway, So the reason for the title of this post is to tell you all about a new connection that I made that I'm OVER THE MOON excited about!!
So the other day I was driving down a road not too far from my house and I spied a huge field with a bunch of super cool looking wooden crate things in it. I also saw tons of twisty piles of industrial scrap metal and such. I drove past...and was SO intrigued that I had to turn around...drive around the perimeter of this field until I found what it was. Well imagine my surprise when I found a large building supply company connected to that field. I knocked on the door and inquired about the crates that I saw. Well after talking for a while with the nicest guy he mentioned that the area that I saw that amazing architectural "junk" is actually their junk pile!!!
I then asked him if I could..you know...look around in their junk pile. He said...are you interested in any of it?? Stifling my extreme joy I casually said, Ya maybe.
Cut to me rummaging through PILES AND PILES...actually more like ACRES AND ACRES of rusty scrap metal...industrial carts that look like they are straight out of the Anthro catalog...pallets with just the right age and patina...rebar...etc. ALL JUNK! this company pretty much told me to take as much as I can off their hands because its more expensive for them to dispose of it then to just let it sit.
!!!!!!!!!!!!!!!!!
So after building my Pallet coffee table I've been really motivated and excited about building more furniture. I have several projects in mind but I'm now going to incorporate industrial salvage items into my furniture plans! Can you imagine? All of it for free??? I am SO excited you guys!!! Stay tuned for a lot of "junk related posts" in the very near future!!! Hope you all have a great great week!
So the other day I was driving down a road not too far from my house and I spied a huge field with a bunch of super cool looking wooden crate things in it. I also saw tons of twisty piles of industrial scrap metal and such. I drove past...and was SO intrigued that I had to turn around...drive around the perimeter of this field until I found what it was. Well imagine my surprise when I found a large building supply company connected to that field. I knocked on the door and inquired about the crates that I saw. Well after talking for a while with the nicest guy he mentioned that the area that I saw that amazing architectural "junk" is actually their junk pile!!!
I then asked him if I could..you know...look around in their junk pile. He said...are you interested in any of it?? Stifling my extreme joy I casually said, Ya maybe.
Cut to me rummaging through PILES AND PILES...actually more like ACRES AND ACRES of rusty scrap metal...industrial carts that look like they are straight out of the Anthro catalog...pallets with just the right age and patina...rebar...etc. ALL JUNK! this company pretty much told me to take as much as I can off their hands because its more expensive for them to dispose of it then to just let it sit.
!!!!!!!!!!!!!!!!!
So after building my Pallet coffee table I've been really motivated and excited about building more furniture. I have several projects in mind but I'm now going to incorporate industrial salvage items into my furniture plans! Can you imagine? All of it for free??? I am SO excited you guys!!! Stay tuned for a lot of "junk related posts" in the very near future!!! Hope you all have a great great week!
I have a profound and undying love of old things. Windows, door knobs, shutters, molding, crates, pallets, etc. The age and patina of old...and especially reclaimed items can NOT be duplicated.
Want to see some of my favorite old things? Well here ya go...


Master bedroom pallet bed and antique ammunition box that I JUST refinished a few days ago. A LOT of people probably thought I was a freak of nature when I wanted to sell my traditional 4 posted bed and make a bed of pallets instead...but you know what? I couldn't love it more! It was free...unique...functional...and looks super chic with the light colors in my room and that dark sassy rustic-ness! The ammunition box was a 5 dolla find at a garage sale...i am in LOVE with how it turned out. Adore. Swoon. I will keep it forever! Had to do a LOT of reinforcing and A LOT of bleaching and vinegar-ing to get the smell out. It was NASTY...but I couldn't be more excited about it now!


Old wood and metal ladder with paint splattered all over it in my entry way. I adore this ladder! It is actually really sturdy thanks to some majorly large bolts and metal rungs...and it works great to drape scarfs over and hang coats on too! Plus I like to pretend that you can't see our non-functioning alarm system box that came with our house! ;)
 Shoe baskets. The one on the left is from Target and isn't old...but i love it. The one on the right is an old veggie crate that I got outside of a Hispanic grocery store by their dumpsters! I actually grabbed 4 of these on the same day and I use them EVERY.WHERE! They aren't particularly sturdy but they are filled to the brim with character and so useful! Toys, kid shoes (see above), files and such in the office, they work great for so many things!


Old Naval trunk. This thing is probably one of my fave Craigslist finds EVER. Oh and did I mention it was 10 bucks?! It has brass corners, silver hinges, is HEAVY and sturdy. Fits everything you could imagine! Right now its storing our DVD's and my cookbooks and they are all hidden away! Love it! The bottom picture is the name of the Navy dude that owned it (really hard to make out what it says) and the Port that he was going to. Portland! Which just so happens to be my home town! :) Love a piece with character AND style!
 Old shutter as picture display! This is actually not a shutter...but a bi-fold closet door that I heavily distressed and hung on the wall. I adore the way it looks! I also stuck the kick stand of a few of my fave pictures down inside the slats and they make a really pretty picture wall! Oh and it was free!


Old window as mirror! I scored a couple old chippy windows at a garage sale for 2 dollars a piece....AND...was able to bring them from Portland to Southern CA in a moving truck without cracking the single pane 100 year old glass! AMAZING accomplishment! I mounted this guy on the wall after using looking glass spray paint on the back side to turn it into a mirror of sorts. The glass is very warped and marbled so it looks crazy awesome and antiqued and old! I achieved a very spotty mirror finish by lightly misting the bare glass with half white vinegar/half water first...and then immediately spraying my first coat of looking glass spray paint over that. Then another layer of vinegar/water...then another of paint. Over and over again until I achieved the darkest finish I could. I left the chippy paint intact and even left the latch on it. Love all those details!
Ok so that covers a few of my favorite old things. I hope you guys are inspired to bring home all that nasty old "trash" and make your home more beautiful for cheap!
Have a blessed week!!!
Linking up to the following parties...

Want to see some of my favorite old things? Well here ya go...


Master bedroom pallet bed and antique ammunition box that I JUST refinished a few days ago. A LOT of people probably thought I was a freak of nature when I wanted to sell my traditional 4 posted bed and make a bed of pallets instead...but you know what? I couldn't love it more! It was free...unique...functional...and looks super chic with the light colors in my room and that dark sassy rustic-ness! The ammunition box was a 5 dolla find at a garage sale...i am in LOVE with how it turned out. Adore. Swoon. I will keep it forever! Had to do a LOT of reinforcing and A LOT of bleaching and vinegar-ing to get the smell out. It was NASTY...but I couldn't be more excited about it now!


Old wood and metal ladder with paint splattered all over it in my entry way. I adore this ladder! It is actually really sturdy thanks to some majorly large bolts and metal rungs...and it works great to drape scarfs over and hang coats on too! Plus I like to pretend that you can't see our non-functioning alarm system box that came with our house! ;)


Old Naval trunk. This thing is probably one of my fave Craigslist finds EVER. Oh and did I mention it was 10 bucks?! It has brass corners, silver hinges, is HEAVY and sturdy. Fits everything you could imagine! Right now its storing our DVD's and my cookbooks and they are all hidden away! Love it! The bottom picture is the name of the Navy dude that owned it (really hard to make out what it says) and the Port that he was going to. Portland! Which just so happens to be my home town! :) Love a piece with character AND style!


Old window as mirror! I scored a couple old chippy windows at a garage sale for 2 dollars a piece....AND...was able to bring them from Portland to Southern CA in a moving truck without cracking the single pane 100 year old glass! AMAZING accomplishment! I mounted this guy on the wall after using looking glass spray paint on the back side to turn it into a mirror of sorts. The glass is very warped and marbled so it looks crazy awesome and antiqued and old! I achieved a very spotty mirror finish by lightly misting the bare glass with half white vinegar/half water first...and then immediately spraying my first coat of looking glass spray paint over that. Then another layer of vinegar/water...then another of paint. Over and over again until I achieved the darkest finish I could. I left the chippy paint intact and even left the latch on it. Love all those details!
Ok so that covers a few of my favorite old things. I hope you guys are inspired to bring home all that nasty old "trash" and make your home more beautiful for cheap!
Have a blessed week!!!
Linking up to the following parties...

You are upstairs right now...putting our son to bed...which is precisely after you had just put our daughter to bed...gotten me a glass of wine and a piece of chocolate cake and turned on my favorite classical piano Pandora station so I could relax. You amaze me. You have the most giving and generous heart. You have a huge heart for the less fortunate and the handicapped. You are very concerned with making sure my love tank is filled and that you do things daily to be a blessing to me. You are so talented musically and that is one of the reasons that I fell in love with you!
God didn't just bless me when he pointed me in the direction of you...he sheltered me. He knew that my heart had a lot of healing to do. He knew that you and only you were going to be loving enough...consistent enough...patient enough...to see me through all the insecurities and allow me to heal. I adore you Ron! You need to know that the almost 7 years that we have been married have been the best years of my life and I look forward to dozens and dozens more with you!!! I love you!!
Two blog posts in ONE day! That must be a record right?! **crickets***
Ok moving on.
My lovely sister in law mentioned that she has A LOT of furniture that needs redoing and wanted me to write a tutorial post on how to go about that. Were talking 80's ugly oak, metal, furniture with stickers on it, etc etc. She has 4 amazing kids so you can only imagine the beating some of the furniture has taken!
Ok here we go...
Wood-
Is it real or fake?
How to tell-Turn it around and look at the back of it. Do you see a thin overlay on top of particle board? Fake!
Do you see wood grain? Real!
Ok now that we know what kind of wood we have lets get to refinishing it.
What do we want to do with it? Do we want to strip it down to its bare nekid original form? Do we want to add amazing turquoise paint and distress it to high heaven? Decide that part first!
I am a BIG fan of sanding. It smooths out the surface...fixes imperfections...and makes the piece ready to look brand new again. If you plan on painting over something then usually just a light sanding on the entire piece is good enough...except for those deep dings and scratches which will need more love. I use a cheap Ryobi Corner Cat palm sander from Home depot that I got about 3 years ago. It has a dust catcher on the back and I have used and abused that sander. Its still going strong and I'll use it until it breaks! I think it was about 30 bucks! If the piece just needs a light scuffing up before paint use 120 grit sandpaper all over and then wipe clean. If there are some severe dings use 80 grit and then 120 grit...and.wipe.clean.
Did you find out that you have fake wood? Particle board Ikea quality cheapo furnishings? Nothing wrong with that at all...you can still make them look pretty...just can't sand them!
In the case of particle board with a veneer overlay your BESTIE is gonna be primer. I love and use Zinser oil based primer. Apply it with a good quality brush (Purdy brushes are THE BEST and worth the small extra investment) and aim for see-through coverage. You want the whole outside of the piece to be covered...but not thickly. It'll give the paint something to grab on to and make the finish really even and durable. You can get Zinser at HD, Lowes, Ace, etc.
Are you wanting bare naked wood...maybe oiled to bring out the grain...but pretty natural? You are gonna hate me here...you are gonna have to strip...the paint that is! Stripping paint or varnish is an ICKY job. I detest...loathe...stripping furniture but sometimes its necessary! If you must strip...you will want to use Citristrip. Its bright orange...smells like...uh...Oranges...and is sold at HD or Lowes. It works great! Follow the directions on the back and watch your old nasty 80's finish bubble up before your very eyes! Make sure to invest also in a good metal scraper while your at the store. You will be doing LOTS of scraping. You might also want to grab a wire brush to remove hard to reach finish in grooves. After your finish has been totally stripped (this may require two or 3 applications of stripper) then you'll need to wash and dry your piece thoroughly (i usually leave it overnight to fully dry) and then sand as mentioned above.
Ok now that I mentioned how to prep your wood surface...now lets get to painting or staining.
Once you've primed your piece and let it dry (in the case of painting the wood) you'll want to choose a latex paint that you like ( I adore the oops section at HD) and paint your piece. If its a large piece you can either use a sponge roller...which are great but don't leave your finish very smooth...or a nice brush (enter your newly purchased Purdy brush). Brush on two coats of your paint color...letting it dry fully in between coats. Satin, semi gloss...doesn't really matter that much on furniture what kind you pick because you are going to seal it with a poly or wax after the paint is dry.
Now that your paint is dry you can distress it lightly, heavily, leave it alone, etc. I really like distressing because it tends to make you less irritated if natural dings happen to it later. I ALWAYS distress furniture that's gonna be around my kids...so that pretty much means I distress EVERYTHING. Only distress your piece in the places that would naturally get dinged. Aim for edges...corners...legs...etc. Never the low points of the piece...always the high points. Get it? Good!
Now time to seal that bad boy! I ADORE.POLY.SO.MUCH!! My favey fave brand is Minwax wipe on Poly (metal can). Satin or gloss finish is your choice. If you want a smooth as a baby's bum finish and wipeable durability then this guy will be your best friend! You apply it with a rag or paper towel...no brush strokes...lightly sand with 220 grit in between coats...and you have a finish that'll stand up to pretty much anything your kids can throw at it! Literally! I use poly on any piece that I stain or paint a darker color...but if you are painting a piece white SKIP poly and use a basic furniture wax. Poly can slightly yellow over time and it'll piss you off if your pretty white dresser looks yellow in six months! Apply wax with a cloth...let dry for about 20 mins..buff off with a new cloth and see a nice sheen. I usually apply at least 3 coats and the finish will be almost as durable as a poly coat!
Ok so say you want to stain a piece. Good for you!! ;)
Staining is fun...it makes wood pretty and I enjoy it.
My fave stain is Minwax Dark Walnut. In my humble opinion its the perfect dark color. Here's a piece where I used it...check it out....here....You apply it with a rag to bare wood....allow to sit on for a few mins...and wipe off gently. ( I really like using old soft t shirts for applying and wiping off stain. No lint and they apply only gentle pressure) After the first coat...if you like the darkness of it then you're done and need to let it cure (dry for about 24 hours)...if not then let it dry for a couple hours and apply another coat in the same way...wipe off. Once all the coats have been applied and wiped off you need to leave that baby alone for a while. Preferably in a not too cold place...so it can cure and the color can harden. Give it about 24 hours before you touch it again!
Once its cured you can poly it like I mentioned above. it'll look gorgeous.
Metal:
So lets say you got a killer deal on a SUPER ugly brass lamp from good will! The shape rocks...but the finish is blech! Spray paint is your friend! I use lots of different brands but Rustoleum is my fave. There are TONS of color options and it just goes on really pretty.
Here's your process....
1)Clean lamp thoroughly and dry
2)Put on a ginormous costco box out in your yard away from anything that you don't want painted
3)Prime that sucker (use spray primer...rustoleum is the best)...aim for a very light coat...keep the can moving and spray from a ways back. Let fully dry.
4)Paint time! Spray it lightly. You do NOT want full coverage on your first...second...or even third coats. You want to apply short...light bursts of paint from a ways back and lightly dust the piece with paint...it'll minimize drips and make it look a lot more professional. If you are painting something super small then one can should do it. If its a piece like a bar cart or a metal shelf unit you will need at least 3 cans of spray paint. do yourself a favor and get double what you think you'll need...it'll save you trips back to the store and you'll use it later if you have leftovers.
5)Let dry fully in between all those coats
6)You can use a spray on clear coat to protect the finish if you want...but I usually skip this step if its a piece that won't be getting a lot of abuse. If it will then by all means use a clear coat!
7)Place in home and marvel at your craftiness!!!
Ok so I think this about covers the basics of painting wood, metal, particle board...if I missed anything please let me know in the comments section and I'll edit and include it! I hope this helps someone create furniture that they LOVE with the stuff that they already have!!!
Ok moving on.
My lovely sister in law mentioned that she has A LOT of furniture that needs redoing and wanted me to write a tutorial post on how to go about that. Were talking 80's ugly oak, metal, furniture with stickers on it, etc etc. She has 4 amazing kids so you can only imagine the beating some of the furniture has taken!
Ok here we go...
Wood-
Is it real or fake?
How to tell-Turn it around and look at the back of it. Do you see a thin overlay on top of particle board? Fake!
Do you see wood grain? Real!
Ok now that we know what kind of wood we have lets get to refinishing it.
What do we want to do with it? Do we want to strip it down to its bare nekid original form? Do we want to add amazing turquoise paint and distress it to high heaven? Decide that part first!
I am a BIG fan of sanding. It smooths out the surface...fixes imperfections...and makes the piece ready to look brand new again. If you plan on painting over something then usually just a light sanding on the entire piece is good enough...except for those deep dings and scratches which will need more love. I use a cheap Ryobi Corner Cat palm sander from Home depot that I got about 3 years ago. It has a dust catcher on the back and I have used and abused that sander. Its still going strong and I'll use it until it breaks! I think it was about 30 bucks! If the piece just needs a light scuffing up before paint use 120 grit sandpaper all over and then wipe clean. If there are some severe dings use 80 grit and then 120 grit...and.wipe.clean.
Did you find out that you have fake wood? Particle board Ikea quality cheapo furnishings? Nothing wrong with that at all...you can still make them look pretty...just can't sand them!
In the case of particle board with a veneer overlay your BESTIE is gonna be primer. I love and use Zinser oil based primer. Apply it with a good quality brush (Purdy brushes are THE BEST and worth the small extra investment) and aim for see-through coverage. You want the whole outside of the piece to be covered...but not thickly. It'll give the paint something to grab on to and make the finish really even and durable. You can get Zinser at HD, Lowes, Ace, etc.
Are you wanting bare naked wood...maybe oiled to bring out the grain...but pretty natural? You are gonna hate me here...you are gonna have to strip...the paint that is! Stripping paint or varnish is an ICKY job. I detest...loathe...stripping furniture but sometimes its necessary! If you must strip...you will want to use Citristrip. Its bright orange...smells like...uh...Oranges...and is sold at HD or Lowes. It works great! Follow the directions on the back and watch your old nasty 80's finish bubble up before your very eyes! Make sure to invest also in a good metal scraper while your at the store. You will be doing LOTS of scraping. You might also want to grab a wire brush to remove hard to reach finish in grooves. After your finish has been totally stripped (this may require two or 3 applications of stripper) then you'll need to wash and dry your piece thoroughly (i usually leave it overnight to fully dry) and then sand as mentioned above.
Ok now that I mentioned how to prep your wood surface...now lets get to painting or staining.
Once you've primed your piece and let it dry (in the case of painting the wood) you'll want to choose a latex paint that you like ( I adore the oops section at HD) and paint your piece. If its a large piece you can either use a sponge roller...which are great but don't leave your finish very smooth...or a nice brush (enter your newly purchased Purdy brush). Brush on two coats of your paint color...letting it dry fully in between coats. Satin, semi gloss...doesn't really matter that much on furniture what kind you pick because you are going to seal it with a poly or wax after the paint is dry.
Now that your paint is dry you can distress it lightly, heavily, leave it alone, etc. I really like distressing because it tends to make you less irritated if natural dings happen to it later. I ALWAYS distress furniture that's gonna be around my kids...so that pretty much means I distress EVERYTHING. Only distress your piece in the places that would naturally get dinged. Aim for edges...corners...legs...etc. Never the low points of the piece...always the high points. Get it? Good!
Now time to seal that bad boy! I ADORE.POLY.SO.MUCH!! My favey fave brand is Minwax wipe on Poly (metal can). Satin or gloss finish is your choice. If you want a smooth as a baby's bum finish and wipeable durability then this guy will be your best friend! You apply it with a rag or paper towel...no brush strokes...lightly sand with 220 grit in between coats...and you have a finish that'll stand up to pretty much anything your kids can throw at it! Literally! I use poly on any piece that I stain or paint a darker color...but if you are painting a piece white SKIP poly and use a basic furniture wax. Poly can slightly yellow over time and it'll piss you off if your pretty white dresser looks yellow in six months! Apply wax with a cloth...let dry for about 20 mins..buff off with a new cloth and see a nice sheen. I usually apply at least 3 coats and the finish will be almost as durable as a poly coat!
Ok so say you want to stain a piece. Good for you!! ;)
Staining is fun...it makes wood pretty and I enjoy it.
My fave stain is Minwax Dark Walnut. In my humble opinion its the perfect dark color. Here's a piece where I used it...check it out....here....You apply it with a rag to bare wood....allow to sit on for a few mins...and wipe off gently. ( I really like using old soft t shirts for applying and wiping off stain. No lint and they apply only gentle pressure) After the first coat...if you like the darkness of it then you're done and need to let it cure (dry for about 24 hours)...if not then let it dry for a couple hours and apply another coat in the same way...wipe off. Once all the coats have been applied and wiped off you need to leave that baby alone for a while. Preferably in a not too cold place...so it can cure and the color can harden. Give it about 24 hours before you touch it again!
Once its cured you can poly it like I mentioned above. it'll look gorgeous.
Metal:
So lets say you got a killer deal on a SUPER ugly brass lamp from good will! The shape rocks...but the finish is blech! Spray paint is your friend! I use lots of different brands but Rustoleum is my fave. There are TONS of color options and it just goes on really pretty.
Here's your process....
1)Clean lamp thoroughly and dry
2)Put on a ginormous costco box out in your yard away from anything that you don't want painted
3)Prime that sucker (use spray primer...rustoleum is the best)...aim for a very light coat...keep the can moving and spray from a ways back. Let fully dry.
4)Paint time! Spray it lightly. You do NOT want full coverage on your first...second...or even third coats. You want to apply short...light bursts of paint from a ways back and lightly dust the piece with paint...it'll minimize drips and make it look a lot more professional. If you are painting something super small then one can should do it. If its a piece like a bar cart or a metal shelf unit you will need at least 3 cans of spray paint. do yourself a favor and get double what you think you'll need...it'll save you trips back to the store and you'll use it later if you have leftovers.
5)Let dry fully in between all those coats
6)You can use a spray on clear coat to protect the finish if you want...but I usually skip this step if its a piece that won't be getting a lot of abuse. If it will then by all means use a clear coat!
7)Place in home and marvel at your craftiness!!!
Ok so I think this about covers the basics of painting wood, metal, particle board...if I missed anything please let me know in the comments section and I'll edit and include it! I hope this helps someone create furniture that they LOVE with the stuff that they already have!!!
Subscribe to:
Posts (Atom)


