When things change

Anyone still here? "tap tap"

So...many apologies because it has truly been forever since I have written on the Ole blog. My life has gotten busy and posting about cute and ultra creative diy projects hasn't been a priority when I was raising THREE humans and trying to maintain my sanity!

So here's the thing....

I know this is MY blog. I know that I can write whatever I freaking want on this blog. But. I have felt a bit stifled about the fact that the original direction that I had for this blog was based on crafty stuff and diy and my kids.  and as my life, interests, goals, and motivations changed...I kinda felt like I didn't have anything to offer by way of DIY inspiration, and so I just didn't write. I kinda just avoided the blog. Lame...I know.

So I am going to change that! Like...FOR REAL. My life right now looks pretty different than it did the last time i posted. And I am honestly tired of just sharing the cute, the creative, the inspiring. and NOT sharing ALL the other remaining stuff that makes up about 99% of my life day to day. So this blog is going to get a little revamp of sorts. I'm gonna post. About whatever I feel like posting about. It may be cooking. It may be plants...because...OBSESSED. It may be travel. It may be a funny story about a diaper explosion (because they are always funny...for the ones NOT involved). It may be about my loving heavenly father who never gives up on me and always pursues me...even when I am a butt face. Its gonna look different on different days. And thats ok.

So...stay tuned! I am back. Promise. :)

What's happening lately...

Hey there blog friends!! I'm again so sorry for my long absence. I have been reading your amazing blogs but not blogging myself because of a fairly severe sickness I've been having. It's called pregnancy! Yes that's right...we are expecting baby number 3! We are very excited, as are the kiddos, who ask every day if the new baby can come out yet?! I am due mid June of next year so I am right at 15 weeks right now. I'm feeling much better these past two weeks which is a huge blessing as I've been able to pursue our second huge announcement...

We are building a house!!!!!!!!!!!

Yes my LONG standing dream of home ownership will finally be coming true! We are going to be done with the building process right around mid August so we will have a two month old! Yikes! It'll be so worth it though as this house is truly our dream house. I have always been a bit of a wanderer. Never feeling settled in one spot and always researching where we were gonna move next. But when we got to Denver we knew it was forever! We LOVE it here and have truly blossomed since moving here! So excited to build our dream house here and expand our family even more!!!! The hardest thing is gonna be waiting to decorate a nursery until this new baby is already here and were in the new house!! I'm such a nesting freak and I know I'll be tempted...but alas...I will resist! I hope you are all well and safe and gearing up for baby Jesus's birthday the same as I am! This is the first Christmas that my little Lyla kinda knows what's going on. So fun experiencing Christmas through little eyes!

I will be sharing the building process as we go along and probably showing you all far too many pics of the foundation and other not so exciting stuff...but bear with me! This is not only our first time being homeowners but we are building this house exactly to our specifications which is amazingly cool!!!

Ok I'm off to run errands and buy baking ingredients for my Moms famous fudge! Merry Christmas to you all!!!


Campaign Dresser re-do


 Hey People! Sorry for the LONG time away. We are now "almost" fully settled in BEAUTIFUL Colorado! We are in a suburb outside of Denver and seriously loving it. Every day we thank God for allowing us to live here!!
I have seriously been a creative maniac since we moved in here. Moving from CA to CO we more than doubled our square footage in our home which is a HUGE GINORMOUS blessing, but also a challenge to decorate and plan the spaces since we have so much more space now. We have an ENTIRE basement that I haven't even touched. The space is empty! So if ya'll see any amazing basement spaces that you think I'd like PLEASE send them my way! Ok so I have a lot...and I mean a LOT of projects to share with you guys. Too many honestly to share in one post so I'm gonna start with a dresser that I scored for free on CL when I was still in CA and hauled it to CO. This thing was in pretty amazing shape. It doesn't have the typical campaign pulls that totally sink into the casing...but I didn't care...free is a very good price! Here's the dresser in its "Ohnoiwanttostartthisprojectbutiforgottotakeabeforepic state"


It wasn't in that bad of shape. Just needed a quick sand, prime, and paint. One of the easiest re-do's I've done in a while! Here's the super sassy after...
I used a really pretty deep blue gray oops paint and Shellac clear coat that I already had. This project was CHEAP! Soaked the amazing campaign hardwear in vinegar and it brightened it up just the right amount. I'm in LOVE with this dresser! I actually gave my daughter my old dresser so I could use this one instead. I love it!!!
The lady that I got it from was the SWEETEST lady ever. She totally didn't think I'd want the dresser because its "Old" and no one else had wanted it! lol if she only knew...she also gave me the cutest drop leaf kitchen table that was her parents kitchen table when they were married. This lady was over 80 years old...so the drop leaf table is at least 150 years old if not older...and what amazing shape its in!

See what I mean? I haven't decided what to do with it yet. The leaves are not the strongest ever and my kids love to pull on the table as they climb in and out of their chairs so I'm just hoping they don't pull the table on top of them one of these days! Oh and check out those chairs...those are a sneak peek...posting about them next week. I hope you all like my new dresser! What do you think I should do with the table? Paint? Stain? Its bare wood except for a thin layer of orange oil. I hope you all have a fabulous week!!!

Denver bound!

Hey everyone!! I wanted to fill you guys in on a little family adventure were getting ready for. Were moving to Denver!!! :) My husband's job change is allowing us to pursue our dreams of living in The Mile High City! 300 plus days of sun per year with GORGEOUS snowy winters? Yes please! Were super excited to get out of Southern California and move to our dream location...or should I say...our dream U.S. location. If someone told me I could move to Italy I'm sure that would trump Denver. lol. If I'm a little on the flakey side with the blog for the next few weeks please forgive me. Two toddlers, a house full of stuff to pack, plans to make, deposits to pay (grr...why are they always so expensive), and plane tickets to buy (were flying instead of driving. Insert a very loud Praise the Lord!!)...and ALL in the next few weeks. our move date is August 4th so were gonna be busy bees for a little bit. Our area in CA is starting to get 100 degree temps...which will last until mid October...so you can imagine my excitement at getting out of here before we all boil to death! lol. I love you all! I would majorly appreciate prayer during this transition. Especially for my kiddos that aren't big fans of change. Wish us luck and I'll be posting some house pictures when we are in and settled!!! Hope you all had a fabulous weekend!

Restoration Hardwear hack bookshelf

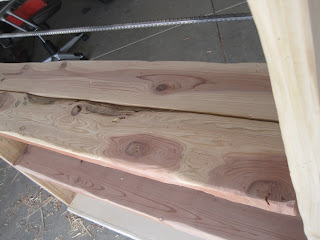
Helloo lovely readers!!! Just wanted to share a recently completed project with ya'll. My hubby and I were SO excited/confident after we built our Farm Table that we decided to tackle a rustic bookshelf. I was majorly inspired by this one.  Check it out. (Our Vintage Home is a treasure trove of awesome DIY ideas! I was actually about to copy the same bookshelf from Restoration Hardware when I saw their version and I loved it SO much!!) We have a lot of books! Not like "hoarders"..but we like to read so we buy books. We have been relying on one small bookshelf for about a year now because...lets face it...bookshelves are expensive unless you go the rickety Ikea route. We wanted solid wood. I have two demolition derby toddlers and I want it to be sturdy!! Well I've been a busy bee accumulating pallet wood and various scrap wood lately and I was determined to build this bookshelf out of wood that I already owned. So I got to work during my kids nap (in 90 degree weather I might add) disassembling pallets to build the bookshelf. I spent two hours, got about 5 slivers, and sweated profusely before I realized that the wood I was getting off these pallets wasn't going to be strong enough...or straight enough...to build the shelf. FAIL. So off to home depot I went with my measurements in hand and supplies list to see if I could score some inexpensive wood. I knew I wanted to shelf to have a "planked" look rather than being super clean and perfect. I wanted it to look like I made it with nasty old barn wood. I ended up buying two 1/12's for the top and bottom shelves and as I was waiting at the wood cutting machine in Home Depot I was in EXTREMELY close proximity to the overflowing with awesome-sauce wood "cull lumber bin". Have you seen the cull bin? Get thee to HD or Lowes and scavenge like a vulture!! Seriously awesome wood to be had in those bins. And the best part is it is CHEAP! Like 50 cents a board cheap! They had just refilled the bin that day...and they had refilled it with RED CEDAR (yes I'm shouting!). And did I mention that the length of those beautiful boards was the exact length I needed? Yup pretty much awesome! It was thick too...and had beautiful imperfections that you just can't create easily (and to think that the imperfections that I was wanting was WHY it ended up in the cull bin to begin with...SCORE!)
So when I got home with all my supplies my hubby and I started building. I decided to splurge and use rebar for the backs of the shelves so the books didn't fall off. I love the industrial vibe it added. And we also got some super cute small metal casters for the bottom so we could move it easily.
This is a close up of the wood sans stain or poly. So pretty and unusual!
Here's the shelf pretty much built with no stain and the rebar in place. If you want step by step instructions for putting this thing together go to Our Vintage Home's site...they did a great tutorial!
We were gonna use the pocket hole system that we used on our table but we just didn't have the energy and wanted it to look rustic so we opted to just put the screws in through the side and have them show. We used silver screws that matched the rebar so it actually looks intentional! Bonus! We adore this shelf. I haven't loaded it up yet because were moving and can't fathom lugging all my books out just to pack them up in a month and a half...but when we get settled you best believe that this shelf will be styled and loaded down with awesome books! Here's the finished product! What do you guys think???

There ya have it! Custom built shelving to fit our needs and our budget! All in all this shelf cost me about 50 bucks to build. No joke! The restoration hardware version is like 2000!!! BAM! I'll take my version any day and I had a blast building it! So please...if you like this shelf do share. I would love to answer any questions you guys have! Oh and to finish it I used my new favey fave rust stain that I mentioned here. SO easy and makes wood look so fab! And I poly coated it with shellac a few times for protection. Done and done! :) Hope you guys have a FAB-U-LOUS weekend!

Linking with the following fab parties:


Furniture Feature Fridays

I built a farm table!!


I guess I should say, My hubby AND I built a farm table. 

How is everyone? Me? I am GREAT! I have been a busy lady lately....as you could all probably assume since I have been MIA for a while. My son started pre-school...sniff sniff...he's SO big and LOVES it! He's truly blossoming and I couldn't be more proud! I also got my booty back in the gym and am feeling really great being more active. I also have been dreaming up a new project. I wanted to build a rustic, chunky farmhouse table. I wanted it to look like this....
Gotta love Restoration Hardware!
So I turned to these plans on Ana White's website to give me a rough guide for how to build it myself. I did a lot of tweaking to the plans to accommodate for some materials that I already owned (several old reclaimed 4X4 posts that i wanted to use for legs) and we also opted to copy RH's table totally and notch out the outside boards on the top to show the legs.

So since I was using reclaimed lumber for my legs I really REALLY wanted to use reclaimed lumber for the top and aprons too. But for whatever reason NO ONE wants to GIVE AWAY 100 year old barn wood. What's wrong with people nowdays? I couldn't afford the barn wood I saw on Craigslist and I REALLY REALLY couldn't afford to do amazing old growth large planks from a cool lumber store near my house. So instead of breaking the bank MAJORLY I opted to head to Lowes and buy new lumber to make up the rest of the wood for the table. Douglas Fir to be exact. It came in to around 70 bucks for the wood. I bought (4) 2x10's for the top that I had the guy cut to 6ft long, (2) 2x2's that we cut at home to use as cross bracers, and (3) 2x4's to use for the aprons. MAJOR TIP: When you are in the lumber store buying your wood. Don't just grab boards off the rack and buy them. Lay them down on the ground...lay them next to each other...Do they match up? Do they have any bends or twists? Are they warped at all? Do they lay perfectly straight? You do NOT NOT NOT want crooked boards and its a HUGE pain in the booty to have to go back to the store when you are in building mode to buy new boards! I speak from personal experience....
Ok so after buying all the wood...cutting all the wood to the proper specs...laying it all out and making sure it matched up...I decided to assemble it in whatever way seemed like the best way. Nevermind the way Ana White...who does this ALL THE TIME...says to do it. I know better right? WRONG! My hubby and I basically assembled this table about 3 times. We did it once...realized that we put the legs on too soon and the aprons wouldn't fit properly...did it again with the aprons on too soon and then realized the cross bracers wouldn't fit properly. There was A LOT of that going on in my garage on building day! It was not fun and we each had about 40 splinters when it was all said and done! Here are a few pics of the table during the process...
 This was us laying out the boards to make sure they matched up...see...NOT perfect...we ended up needing to recut a few.
Here's where we lay out our apron pieces to see if they match up with our notched out side boards. They did! Woot!
Here's the whole table put together...minus screws...with my fabulous salvage legs!

I could show you a TON of other pics....but I'm impatient and want to get to the BIG REVEAL already!! If you want detailed pics of the process then go to Ana's site. She rocks!

Here we go....deep breath....

TAH DAH!!!!!! I am beyond obsessed with this table. Like....I want to marry it and have its babies!!!! It turned out exactly the way I was wanting. Here's a close up of all the distressed goodness on the top....
See those dents...err....gouges on the edges? That was accomplished with a chisel...a LOT of sweat in the 95 degree weather...and determination to make this new wood look fabulously old.

Here's another shot...
Yup. Pretty much obsessed. If you guys are curious what I used to "age" the new wood....here's a secret. RUST! I soaked a couple of chopped up steel wool pads in a jar of white vinegar for a few days. It dissolved...and then I mixed a splash of that mixture with enough water to get the right color and painted it on. let it dry. and poly coated the top. Seriously a genius method and I LOVE that you don't need to wipe it off or let it "cure" before you can finish the rest. Its my new go-to stain!!

I seriously apologize that I've been neglecting you all lately. Pinkie promise that I'll do better!!! Hope you all have a fab weekend!!

Sharing this project at the following fab parties:

Coastal Charm


Furniture Feature Fridays The Shabby Nest
Chic on a Shoestring Decorating

My new conquest...

Hey awesome people! Sorry SO SORRY its been forever since I've posted. I have had...not only a severe creative drought...but also 4 people in my house with a severe virus. My son decided that starting preschool 3 weeks ago gave him the right to infect his whole family with the plague! The worst cold/fever/cough that has hit us in a while! Plus it turned into bronchitis and an ear infection for my son. Good times. Good times indeed. Anyway, So the reason for the title of this post is to tell you all about a new connection that I made that I'm OVER THE MOON excited about!!

So the other day I was driving down a road not too far from my house and I spied a huge field with a bunch of super cool looking wooden crate things in it. I also saw tons of twisty piles of industrial scrap metal and such. I drove past...and was SO intrigued that I had to turn around...drive around the perimeter of this field until I found what it was. Well imagine my surprise when I found a large building supply company connected to that field. I knocked on the door and inquired about the crates that I saw. Well after talking for a while with the nicest guy he mentioned that the area that I saw that amazing architectural "junk" is actually their junk pile!!!
I then asked him if I could..you know...look around in their junk pile. He said...are you interested in any of it?? Stifling my extreme joy I casually said, Ya maybe.

Cut to me rummaging through PILES AND PILES...actually more like ACRES AND ACRES of rusty scrap metal...industrial carts that look like they are straight out of the Anthro catalog...pallets with just the right age and patina...rebar...etc. ALL JUNK! this company pretty much told me to take as much as I can off their hands because its more expensive for them to dispose of it then to just let it sit.

!!!!!!!!!!!!!!!!!

So after building my Pallet coffee table I've been really motivated and excited about building more furniture. I have several projects in mind but I'm now going to incorporate industrial salvage items into my furniture plans! Can you imagine? All of it for free??? I am SO excited you guys!!! Stay tuned for a lot of "junk related posts" in the very near future!!! Hope you all have a great great week!