Showing posts with label Free. Show all posts

Campaign Dresser re-do


 Hey People! Sorry for the LONG time away. We are now "almost" fully settled in BEAUTIFUL Colorado! We are in a suburb outside of Denver and seriously loving it. Every day we thank God for allowing us to live here!!
I have seriously been a creative maniac since we moved in here. Moving from CA to CO we more than doubled our square footage in our home which is a HUGE GINORMOUS blessing, but also a challenge to decorate and plan the spaces since we have so much more space now. We have an ENTIRE basement that I haven't even touched. The space is empty! So if ya'll see any amazing basement spaces that you think I'd like PLEASE send them my way! Ok so I have a lot...and I mean a LOT of projects to share with you guys. Too many honestly to share in one post so I'm gonna start with a dresser that I scored for free on CL when I was still in CA and hauled it to CO. This thing was in pretty amazing shape. It doesn't have the typical campaign pulls that totally sink into the casing...but I didn't care...free is a very good price! Here's the dresser in its "Ohnoiwanttostartthisprojectbutiforgottotakeabeforepic state"


It wasn't in that bad of shape. Just needed a quick sand, prime, and paint. One of the easiest re-do's I've done in a while! Here's the super sassy after...
I used a really pretty deep blue gray oops paint and Shellac clear coat that I already had. This project was CHEAP! Soaked the amazing campaign hardwear in vinegar and it brightened it up just the right amount. I'm in LOVE with this dresser! I actually gave my daughter my old dresser so I could use this one instead. I love it!!!
The lady that I got it from was the SWEETEST lady ever. She totally didn't think I'd want the dresser because its "Old" and no one else had wanted it! lol if she only knew...she also gave me the cutest drop leaf kitchen table that was her parents kitchen table when they were married. This lady was over 80 years old...so the drop leaf table is at least 150 years old if not older...and what amazing shape its in!

See what I mean? I haven't decided what to do with it yet. The leaves are not the strongest ever and my kids love to pull on the table as they climb in and out of their chairs so I'm just hoping they don't pull the table on top of them one of these days! Oh and check out those chairs...those are a sneak peek...posting about them next week. I hope you all like my new dresser! What do you think I should do with the table? Paint? Stain? Its bare wood except for a thin layer of orange oil. I hope you all have a fabulous week!!!

My new conquest...

Hey awesome people! Sorry SO SORRY its been forever since I've posted. I have had...not only a severe creative drought...but also 4 people in my house with a severe virus. My son decided that starting preschool 3 weeks ago gave him the right to infect his whole family with the plague! The worst cold/fever/cough that has hit us in a while! Plus it turned into bronchitis and an ear infection for my son. Good times. Good times indeed. Anyway, So the reason for the title of this post is to tell you all about a new connection that I made that I'm OVER THE MOON excited about!!

So the other day I was driving down a road not too far from my house and I spied a huge field with a bunch of super cool looking wooden crate things in it. I also saw tons of twisty piles of industrial scrap metal and such. I drove past...and was SO intrigued that I had to turn around...drive around the perimeter of this field until I found what it was. Well imagine my surprise when I found a large building supply company connected to that field. I knocked on the door and inquired about the crates that I saw. Well after talking for a while with the nicest guy he mentioned that the area that I saw that amazing architectural "junk" is actually their junk pile!!!
I then asked him if I could..you know...look around in their junk pile. He said...are you interested in any of it?? Stifling my extreme joy I casually said, Ya maybe.

Cut to me rummaging through PILES AND PILES...actually more like ACRES AND ACRES of rusty scrap metal...industrial carts that look like they are straight out of the Anthro catalog...pallets with just the right age and patina...rebar...etc. ALL JUNK! this company pretty much told me to take as much as I can off their hands because its more expensive for them to dispose of it then to just let it sit.

!!!!!!!!!!!!!!!!!

So after building my Pallet coffee table I've been really motivated and excited about building more furniture. I have several projects in mind but I'm now going to incorporate industrial salvage items into my furniture plans! Can you imagine? All of it for free??? I am SO excited you guys!!! Stay tuned for a lot of "junk related posts" in the very near future!!! Hope you all have a great great week!

New uses for old things!

I have a profound and undying love of old things. Windows, door knobs, shutters, molding, crates, pallets, etc. The age and patina of old...and especially reclaimed items can NOT be duplicated.

Want to see some of my favorite old things? Well here ya go...


 Master bedroom pallet bed and antique ammunition box that I JUST refinished a few days ago. A LOT of people probably thought I was a freak of nature when I wanted to sell my traditional 4 posted bed and make a bed of pallets instead...but you know what? I couldn't love it more! It was free...unique...functional...and looks super chic with the light colors in my room and that dark sassy rustic-ness! The ammunition box was a 5 dolla find at a garage sale...i am in LOVE with how it turned out. Adore. Swoon. I will keep it forever! Had to do a LOT of reinforcing and A LOT of bleaching and vinegar-ing to get the smell out. It was NASTY...but I couldn't be more excited about it now!


Old wood and metal ladder with paint splattered all over it in my entry way. I adore this ladder! It is actually really sturdy thanks to some majorly large bolts and metal rungs...and it works great to drape scarfs over and hang coats on too! Plus I like to pretend that you can't see our non-functioning alarm system box that came with our house! ;)

Shoe baskets. The one on the left is from Target and isn't old...but i love it. The one on the right is an old veggie crate that I got outside of a Hispanic grocery store by their dumpsters! I actually grabbed 4 of these on the same day and I use them EVERY.WHERE! They aren't particularly sturdy but they are filled to the brim with character and so useful! Toys, kid shoes (see above), files and such in the office, they work great for so many things!


 Old Naval trunk. This thing is probably one of my fave Craigslist finds EVER. Oh and did I mention it was 10 bucks?! It has brass corners, silver hinges, is HEAVY and sturdy. Fits everything you could imagine! Right now its storing our DVD's and my cookbooks and they are all hidden away! Love it! The bottom picture is the name of the Navy dude that owned it (really hard to make out what it says) and the Port that he was going to. Portland! Which just so happens to be my home town! :) Love a piece with character AND style!

Old shutter as picture display! This is actually not a shutter...but a bi-fold closet door that I heavily distressed and hung on the wall. I adore the way it looks! I also stuck the kick stand of a few of my fave pictures down inside the slats and they make a really pretty picture wall! Oh and it was free!

 Old window as mirror! I scored a couple old chippy windows at a garage sale for 2 dollars a piece....AND...was able to bring them from Portland to Southern CA in a moving truck without cracking the single pane 100 year old glass! AMAZING accomplishment! I mounted this guy on the wall after using looking glass spray paint on the back side to turn it into a mirror of sorts. The glass is very warped and marbled so it looks crazy awesome and antiqued and old! I achieved a very spotty mirror finish by lightly misting the bare glass with half white vinegar/half water first...and then immediately spraying my first coat of looking glass spray paint over that. Then another layer of vinegar/water...then another of paint. Over and over again until I achieved the darkest finish I could. I left the chippy paint intact and even left the latch on it. Love all those details!

Ok so that covers a few of my favorite old things. I hope you guys are inspired to bring home all that nasty old "trash" and make your home more beautiful for cheap!

Have a blessed week!!!

Linking up to the following parties...
Saved by Suzy

Green Hutch with hot legs


 Hey guys! I posted this post a while back about a hutch that I got for free from my friend. She didn't like it, wanted it gone, and I GLADLY took it off her hands. Swoon..I was in love with the spindly legs and curved front...and those knobs. to.die.for. Well I lived with it in its birdseye maple-ness for several months before I just couldn't stand it anymore and I HAD to paint it! I used a combo of two pints of oops paint that I had in my garage. I wanted a kind of bright mint green and I think I achieved my goal! I went completely against my normal protocol on this piece. I didn't sand it AT ALL. Didn't prime it either! GASP. I also didn't strip it to remove the wax. I wanted to get it painted while my kids napped and I was trying to be quiet...so I mixed the paint...realized I dug the color...and slapped it on this sucker! I LOVE how it turned out. The color is bright but goes so well in the room! Its amazing how much more I love this piece now. Its a statement maker...that's for sure! What do ya'll think?


Linking up with the following fab parties:


HOG

Furniture Feature Fridays
Photobucket

Saved by Suzy
The Shabby Nest
Chic on a Shoestring Decorating
Photobucket

Burlap Fall banner and a harvest mantle

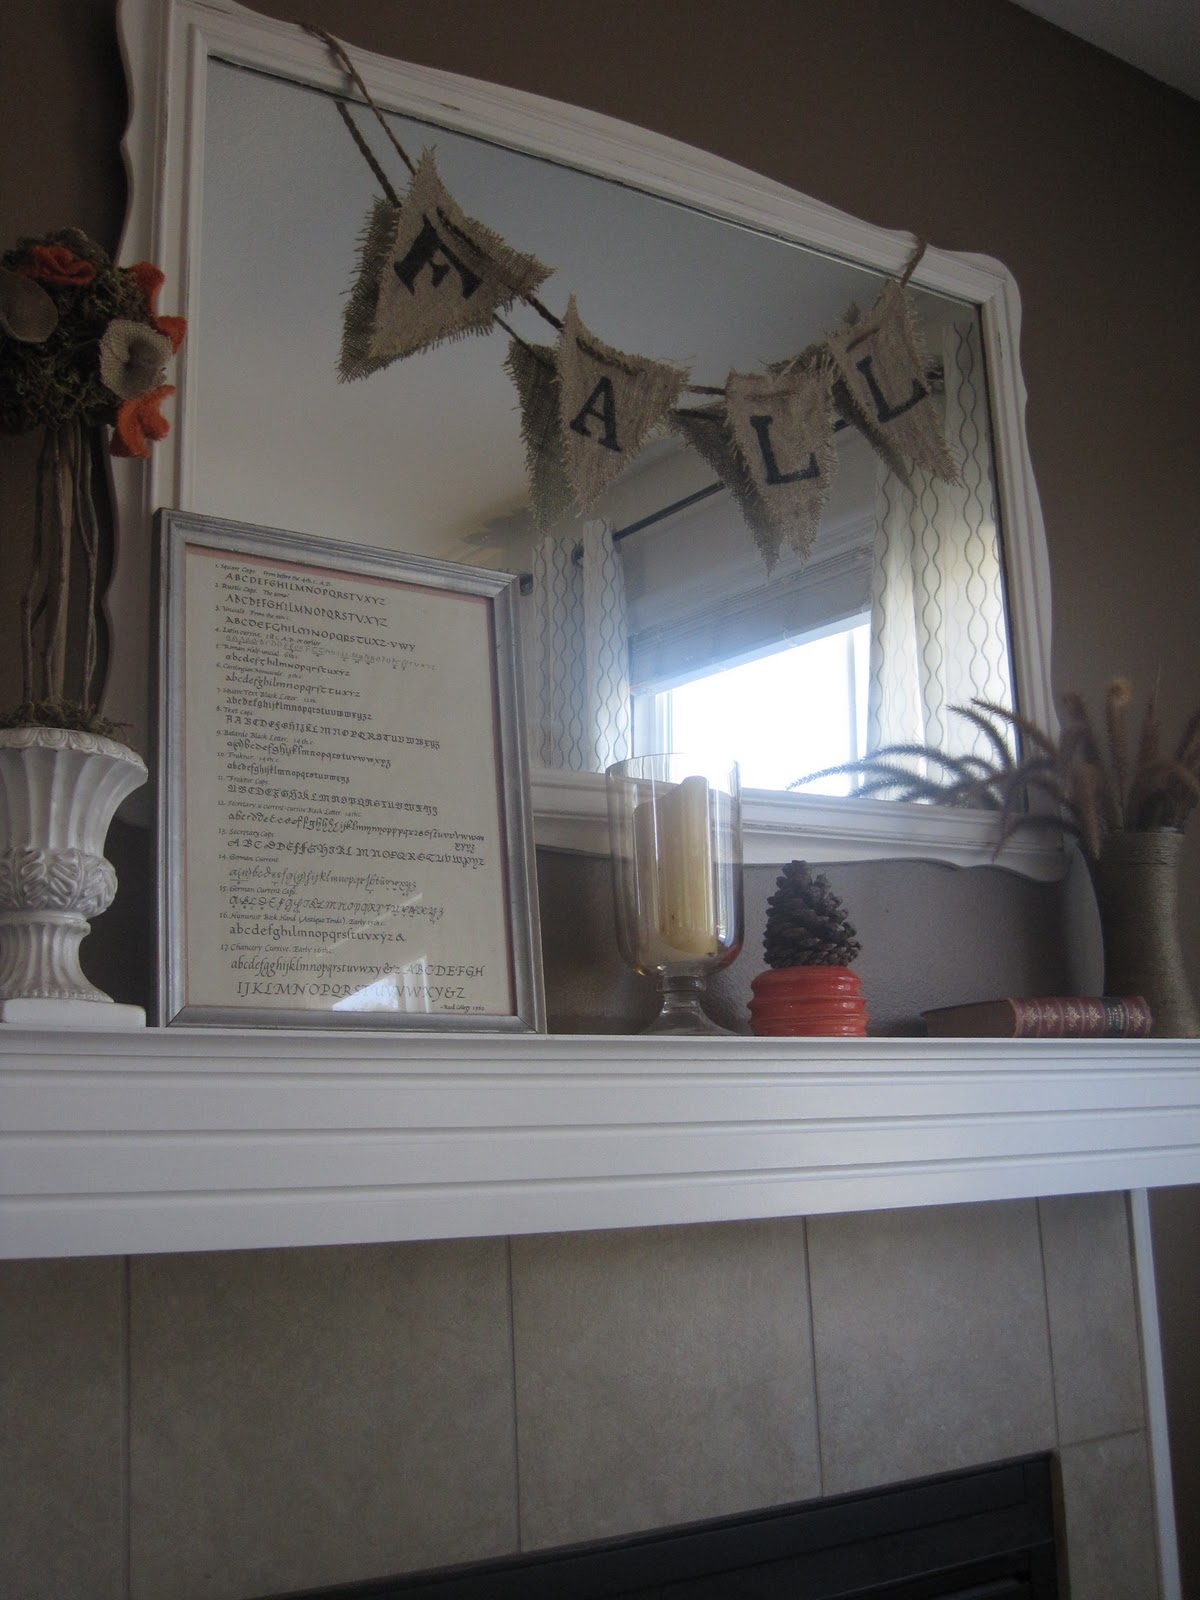
Hey guys! I got a little creative yesterday...you know...instead of cleaning my house or doing the 12 loads of laundry that needed to be washed. Sometimes the mood just strikes and you have to give in! ;) I wanted a Fall mantle that wasn't too theme-y or busy. I wanted to work with what I have and "shop the house" for the pieces to decorate with. Isn't it amazing how things that you already have can be re-invented to make something totally new? Love that! So I have a few things that always live on my mantle. I have a faux topiary in a white antiqued urn, the mirror on the wall, and a vintage cursive handwriting sheet from a college in my hometown. I wanted to add in other things that went with the season but would work with what I already had going on up there. So here's what I came up with...
I added some small pinched flowers all over the topiary in both orange and burlap...looks a little funky from that angle but its cute in person..promise! :) I also added a cream candle in a large amber glass pedestal vase, I took a small orange dish that I made in high school ceramics class and put a large pinecone in it. I added an old book that I plan on putting something on top of...any ideas? I also added my mod podged jute vase project from a year ago with some pom-pas grass from my yard. Oh and of course my new burlap Fall banner that I made yesterday! You too can make one! Sooo simple....here's what you need...
Burlap-Cut into triangles that are roughly the same size. One triangle for each letter.
Acrylic paint/small paint brush-Black for me so its easy to see but orange or white would've been really cute too!
Your computer- I printed out the word Fall in a font I liked
Mod podge-I used matte
Twine for hanging

Cut out your triangles of burlap first. If the burlap is wrinkly you can rinse it with water and smooth out the fibers and stretch it lightly when its wet. This will remove the wrinkles to give you an even surface to paint on but it also causes the edges to fray a little and looks really cute when dry.
Once your triangles are dry you want to cut two slits in each one to feed your twine through. The slits need to be parallel and near the wide edge so the point is hanging down.
Next sketch your letter on your triangle. You could use the light trick and put your paper behind your burlap but I decided to wing it. I'm crazy like that! I used a plain black sharpie to sketch it with because my paint was black and I wanted it to blend.
Fill in your sketched letters with acrylic paint and let dry.
Apply a layer of mod podge on one side of each triangle and let dry. Once dry do the same thing to the other side and let dry. This will prevent your burlap from fraying and give the triangles a stiffer and more obvious shape.
Feed your twine through your new triangles and hang! I put mine over the mirror and I love it there but it'd be super cute in a doorway or on your porch outside (keep it out of the rain though). I hope you all try this...super easy and fun!
Have a great week!!

Linking up with...
Whatever Wednesday at Mommahenscoop
One project at a time @A bowl full of lemons
Nifty Thrifty Tuesday @Coastal Charm
Anything goes party@Type A Decorating

Refinishing a veneer table...a tutorial

Hey there! I wanted to share a little project that I just completed with all of you. My next door neighbor came over the other day and mentioned how much she loved my dining table. Well I was looking to unload it and get a rectangular dining table that fit at least 6 chairs comfortably. She had the rectangular table that I was looking for....and I had the oval table that she was looking for. She suggested that we trade and I was all over it!! Her table was a rather typical farmhouse style table. Orange-ish wood laminate top over particle board, with solid wood white painted legs. I'm sure you can all picture what I'm talking about. It looks kinda like this...
Mine has slightly cooler legs and a way less cool/rustic/antique top. Even though the top was not solid wood the table is STURDY and has a leaf and I loved the size. I knew I wanted to re-stain the top of the table but didn't know how to go about that considering it is particle board with a VERY thin piece of veneer on top. Have any of you ever tried to research how to re-stain veneer? There is very little information out there! I found a great tutorial on Young house Love showing how to refinished a veneer dresser...but they cautioned against re-staining a piece of furniture that has a very thin veneer...which mine does. Well I figured I'd just go for it...I didn't have anything to lose since the table was free and I figured if it turned out horrible I could always just paint over it.
If you have a table like mine, and the top is a little worse for wear then assemble the following items and lets get this party started!!
You will need:
Paint stripper-I used Klean Strip but have used Citristrip before and liked it just as well.
Metal scraper-Mine is a husky brand scraper that I use ALL.THE.TIME. HD carries it.
Paint brush-I recommend digging out the old crusty brittle brush for this project...the stripper softens it and removes the built up gunk and afterwards you can wash it and it's usable again! Added bonus!!
Rubber gloves/mask-or you can be like me and work outside where there is lots of airflow...do use gloves though!
Wire brush
Power sander and 120 grit sandpaper
Steel wool-any grade will work. I used a fairly coarse kind.
Pre-stain conditioner-Made by Minwax and a VERY necessary step of this project!
Stain-My go to stain is always Minwax liquid stain in Dark Walnut.
Poly coat-I use Minwax wipe on poly in Satin. It works great and no brushes to clean.

Ok so the first step to this project is to strip your table top. You can sand off your finish on a solid wood table but with veneer that's really thin like mine, I recommend stripping instead....much gentler on your table top!
Apply the stripper in an even layer all over your table top and use your brush to make sure it gets the top totally covered. Make sure that the stripper gets into the grooves and around the edge. (make sure you do this in your garage with the door open, or outside so you get tons of airflow...strippers are NASTY smelling and toxic...you want to be safe with this stuff!!) After you've applied the stripper you want to let it sit on the top for about 20 mins. If you are in an area that is really hot you can apply wax paper in a single layer over the stripper to keep it from evaporating and getting sticky. I didn't do this step. After a few mins you will notice little bubbles starting to form and the finish will start to look clumpy and weird. That's good! After 20 mins or so has passed scrape off a little and see if it gets down to the bare wood. If so then you are good to go. Scrape off the old finish making sure to go in the direction of the wood grain. Put the gunky finish in a plastic grocery store bag as you scrape it off. Once your table top is totally scraped off then use your wire brush and scrub the grooves and edges with it. That'll remove any finish that's stuck in grooves or around the edges. If any of the finish is still clinging stubbornly to the table just add a little more stripper and repeat this step. Mine took 2 full coats of stripper! After the top is all clean wipe it down with an old towel soaked in hot water...really scrub the top and sides...use the wire brush in some soapy water if you have to. Make sure its really clean.
Once the top is fully dry you want to give it an even light sanding. I used 120 grit sandpaper but you could use 240 too and that would work great. I just used what I had. Sand lightly over the whole top and sides in the direction of the wood grain. Make sure not to let the sander sit on any area for too long as it'll wear down the veneer and the stain won't adhere correctly.
After the sanding step you want to wipe down the whole thing with a damp cloth and let it dry.
Next use a paper towel and apply a light coat of the pre-stain conditioner. This will prep the surface and make sure that the stain adhere's evenly! There is NOTHING worse than have a leopard spotted table. I have been there and it's not fun! After it's sat for a few mins wipe of any excess. 
Here comes the fun part...the stain! Slap on those rubber gloves...you'll need them!
Ok so there are several schools of thought on stain. You can either apply it with a cloth, a brush, or a sponge brush applicator. I used the sponge brush because it lays down an even amount of stain with each stroke and you can throw the sucker away afterwards! Love that part. :) Lightly apply a thin layer of stain over the whole top and sides of your table...make SURE you don't leave streaks and make sure to go in the direction of the wood grain!!! Let it sit for anywhere from 5-20 mins depending on how dark you want your table. I let it sit for about 15 mins. Lightly wipe off the stain with a clean lint free cloth. I used an old tee shirt. After that I let the table dry for a couple hours. After it was dry to the touch I applied a second coat of stain in the same way. I let this one sit for about 20 mins. Wipe off again. You could apply a 3rd layer if you want but I liked the color after the 2nd layer so I stopped there. Let table sit OVERNIGHT. Do.not.get.overly.impatient with this step...you'll thank me later!
Ok its the next day and your table has had overnight to cure! Sip your morning coffee and give your trusty can of Wipe on Poly a thorough shake! Slap on those "clean" rubber gloves again and grab another tee shirt (or if you have about 50 mate-less athletic socks like I do you can put one of those guys over your gloved hand and use it to apply the poly...kind of like a car wash mit! Works GREAT!) The back of the poly can says to apply a little to a cloth and rub on the table in a circular motion. You could do that if you want...but I'm impatient and I don't like all my poly absorbing into my cloth so I just dumped a small amount directly on to my table top and rubbed it around evenly with the athletic-sock-poly-applying-mit. Works even better that way! You will see a small amount of stain residue on your sock...that's ok. After the poly fully dries you want to rub the whole top lightly with steel wool to smooth the surface. You will see small scratches and you will have a momentary freak out moment thinking that they will ruin your finish. Don't freak. It'll be fine! Wipe down table top to remove dust and apply a second coat in the same way. Let dry...wipe even more lightly with steel wool and repeat with another coat. After your 3rd coat dries you shouldn't have to use any steel wool. If you use it in between the first and second coat then you normally have a VERY smooth surface by that point.
After your table is no longer fumy you can bring it inside. I wouldn't recommend using it for normal use until at least 24 hours after you finish it. It says on the can that it takes like 4 weeks to fully cure so you want to use it very gently for a while...or at least try!

Phew!! You guys still here?? Want to see my finished product?? I thought so!


Pretend you don't see the pile of randomness on my kitchen counter in the 2nd pic! So there ya have it! I'm gonna be touching up the white paint on the base of the table thanks to some unfortunate paint stripper drips...but that's gonna wait a bit. I adore my new table and I know you will adore yours too!!! Oh and this may seem obvious to some of you but make SURE when you refinish your table that you do the leaf too!!!!! I did most of my table before I remembered the leaf. There's nothing worse then forgetting and having everyone over on thanksgiving and being sheepish about your two tone table top! So do the leaf too ok? Ok! I hope you all have a fabulous weekend!!!!

Linking up to these parties:
Twice owned Tuesday @ House of Grace


Settling in and a recent re-do

We made it to California!! Such a long and exhausting process but we are here and very thankful! I have been a very busy bee lately with major unpacking, and sorting, and box-breaking-down-ing that I haven't had much time to do anything inspiring in the furniture re-do department but I do have a small project to share with you. Right before we moved (like two days before) a friend of mine told me that she had an antique sideboard (think gorgeous tall carved legs) that she was trying to get RID of! She doesn't like it...its been in her family for EVER (since that's how old it is) and it doesn't fit anyone's decor style so she asked me if I wanted it. Uh YA I did! Here she is...

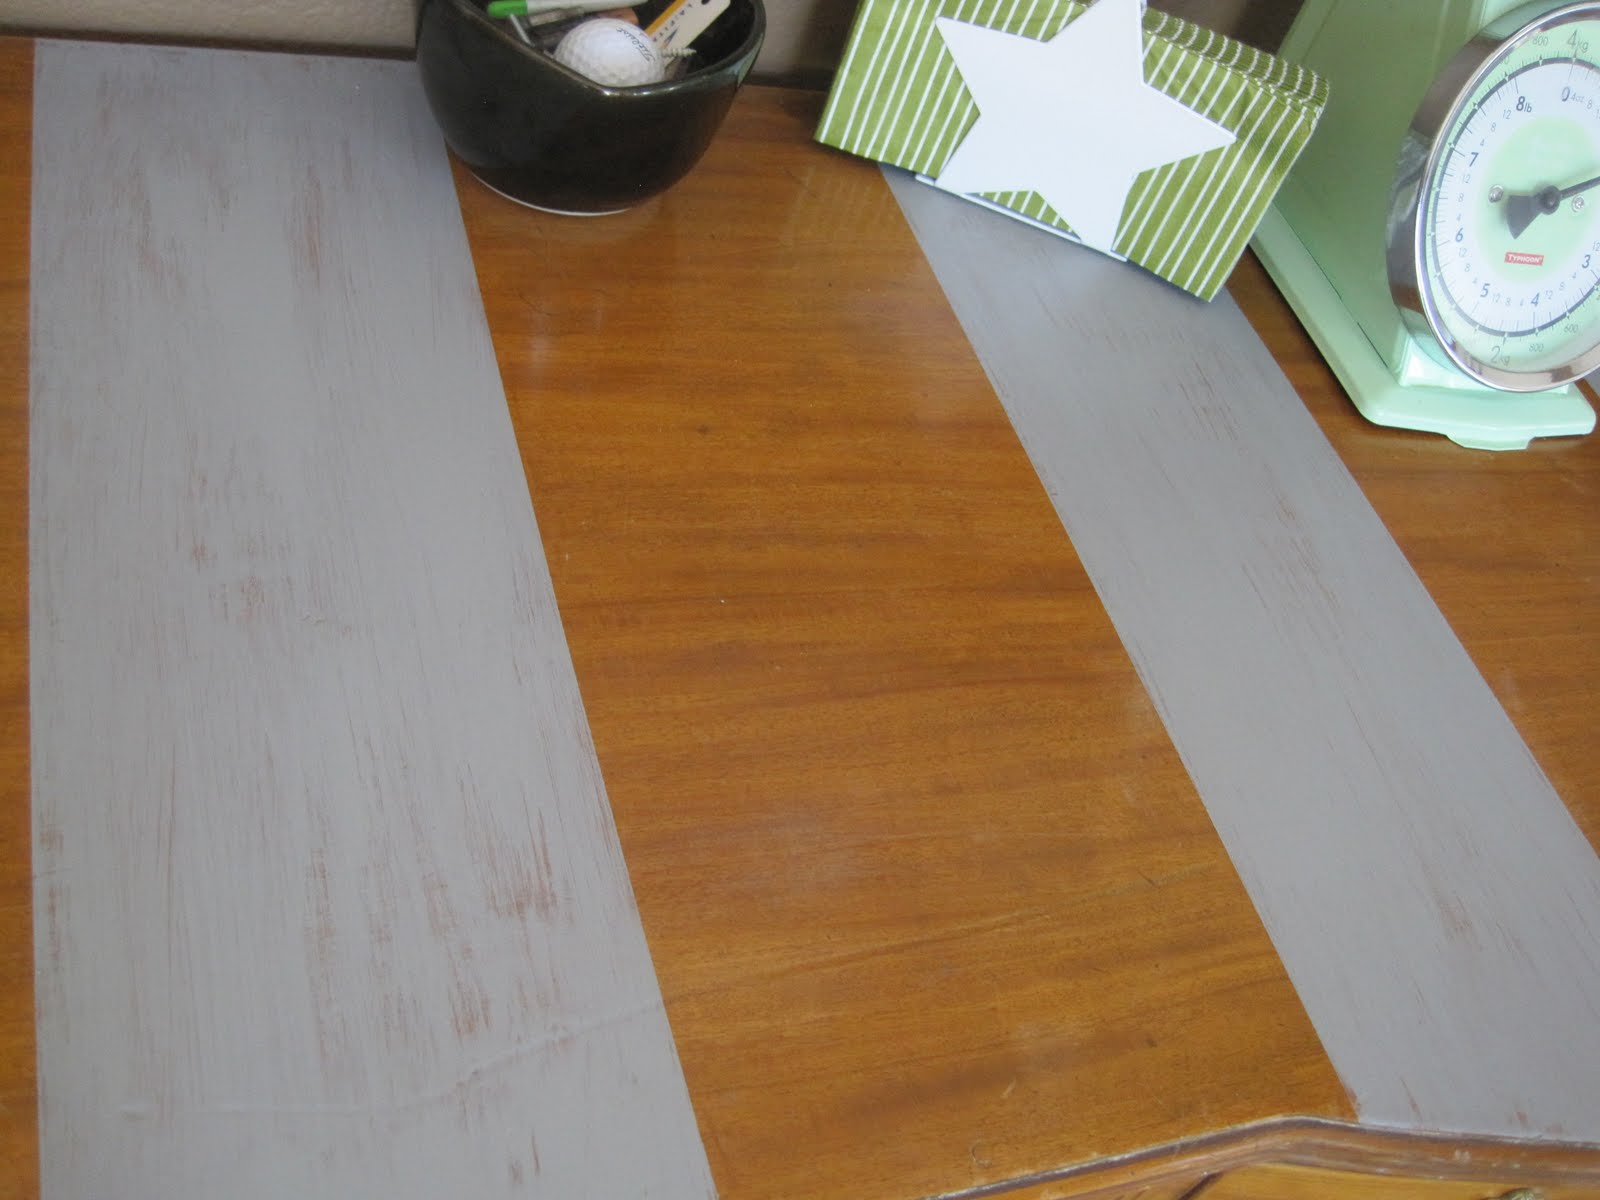
I had wanted a vintage sideboard for a really long time and free (and solid, and gorgeous, and durable, and BIRDSEYE MAPLE) is a very good price! Did I mention its Birdseye maple?? Oh I did...ya it is! So here's the thing...even though the finish is gorg it was in less than great shape with tons of scratches/fading/etc. I honestly almost painted it...I had NO idea how to repair birdseye maple and I didn't even want to try. I was planning on painting it gray or white...lots of distressing...yada yada typical stuff..but something inside me said WHAT ARE YOU THINKING? I didn't have a sense of peace or purpose about painting over this gorgeous wood...even though it was less than gorgeous at the moment! So I got on good ol google and researched how to spruce it up. It had a large white stain on the top (like the kind that moisture causes) and I figured that the only way to get it out would be painting over it. Well I was WRONG. Did you know that an old T shirt/plus a low/medium heat iron=wood stain removal powerhouse team?? It does work and it works WONDERS! Water rings, white stains, brown stains...if water caused it...the iron/t-shirt combo gets it out! It takes a while...put on a movie and get comfy because you'll be bored out of your mind. Or do what I did...set the tshirt on the top...the iron FACE down on top of that and walk away for a couple mins. No joke. You'll come back and lift it up and it'll be WAY less noticeable or gone! My spot was really really big so I had to move the iron around about 502 times before it was a ton better but each time I saw improvement. I didn't give up and neither should you!! :) So while the iron was doing its job I decided to go to work on the scratches. I had an old minwax stain pen in Golden oak from some scratched hardwood rental house floors that we repaired before we moved out to insure we got our deposit back (were sneaky ones!) and I started lightly painting the pen tip over those scratches...they made them blend in SO much! It worked wonders! I drained that whole pen on this sideboard! I recommend the pen option if you don't want to re-do a whole piece and just have a scratch to repair that's lighter than the piece...try it! You'll be amazed! So after thoroughly ironing the top and fixing the scratches I took off the gross hardwear and soaked them in white vinegar for about an hour and then cleaned them thoroughly with soap and water and a toothbrush in the grooves. Lo and behold they are BRIGHT GOLD! SWOON! Birdseye maple AND bright gold ring pulls???? I'm in heaven! The stain on the top was made significantly less obvious but I still didn't totally dig it so I decided to leave the base alone and paint wide gray stripes on the top to hide some of the worse areas. I love and adore this piece. It totally "makes" my dining room and I will NEVER sell it!
Here she is after her make-over!

Close up of the gorgeous hardwear!

And here's how that area looks as of today. I put my large book page canvas above it, plus a few fun dining room-ish items on top. I seriously love it!

Oh and I almost forgot...the stripes! I dry-brushed them on to let some of the wood show through!

LOVE! Oh and last but not least...remember that yucky white stain? Well scroll above to the before pic with the adorable pooch in the pic...see that heinous HUGE white stain??? Well here it is today after the iron/tshirt removal miracle...
Yup it pretty much rocks. There was no photo shop involved people...it really worked that well! I'm totally gonna be ironing ALL my unpainted pieces now because goodness knows they've got LOTS of rings to remove! I hope you all are having a FAB week! Thanks for reading this here blog...I adore your comments!!

Linking up to...

southern hospitality
Furniture Feature Fridays
The Shabby Nest

Refinishing a Mid Century Modern dresser part 2

Hey there! Sorry this post is slightly delayed. I had major issues with this beast of a dresser but PHEW its done now! Ok so in part one of this journey I showed you guys the demolition process of this re-do...the gritty...not pretty...but VERY necessary steps to getting this dresser ready to be painted and shined! So...diving right in....
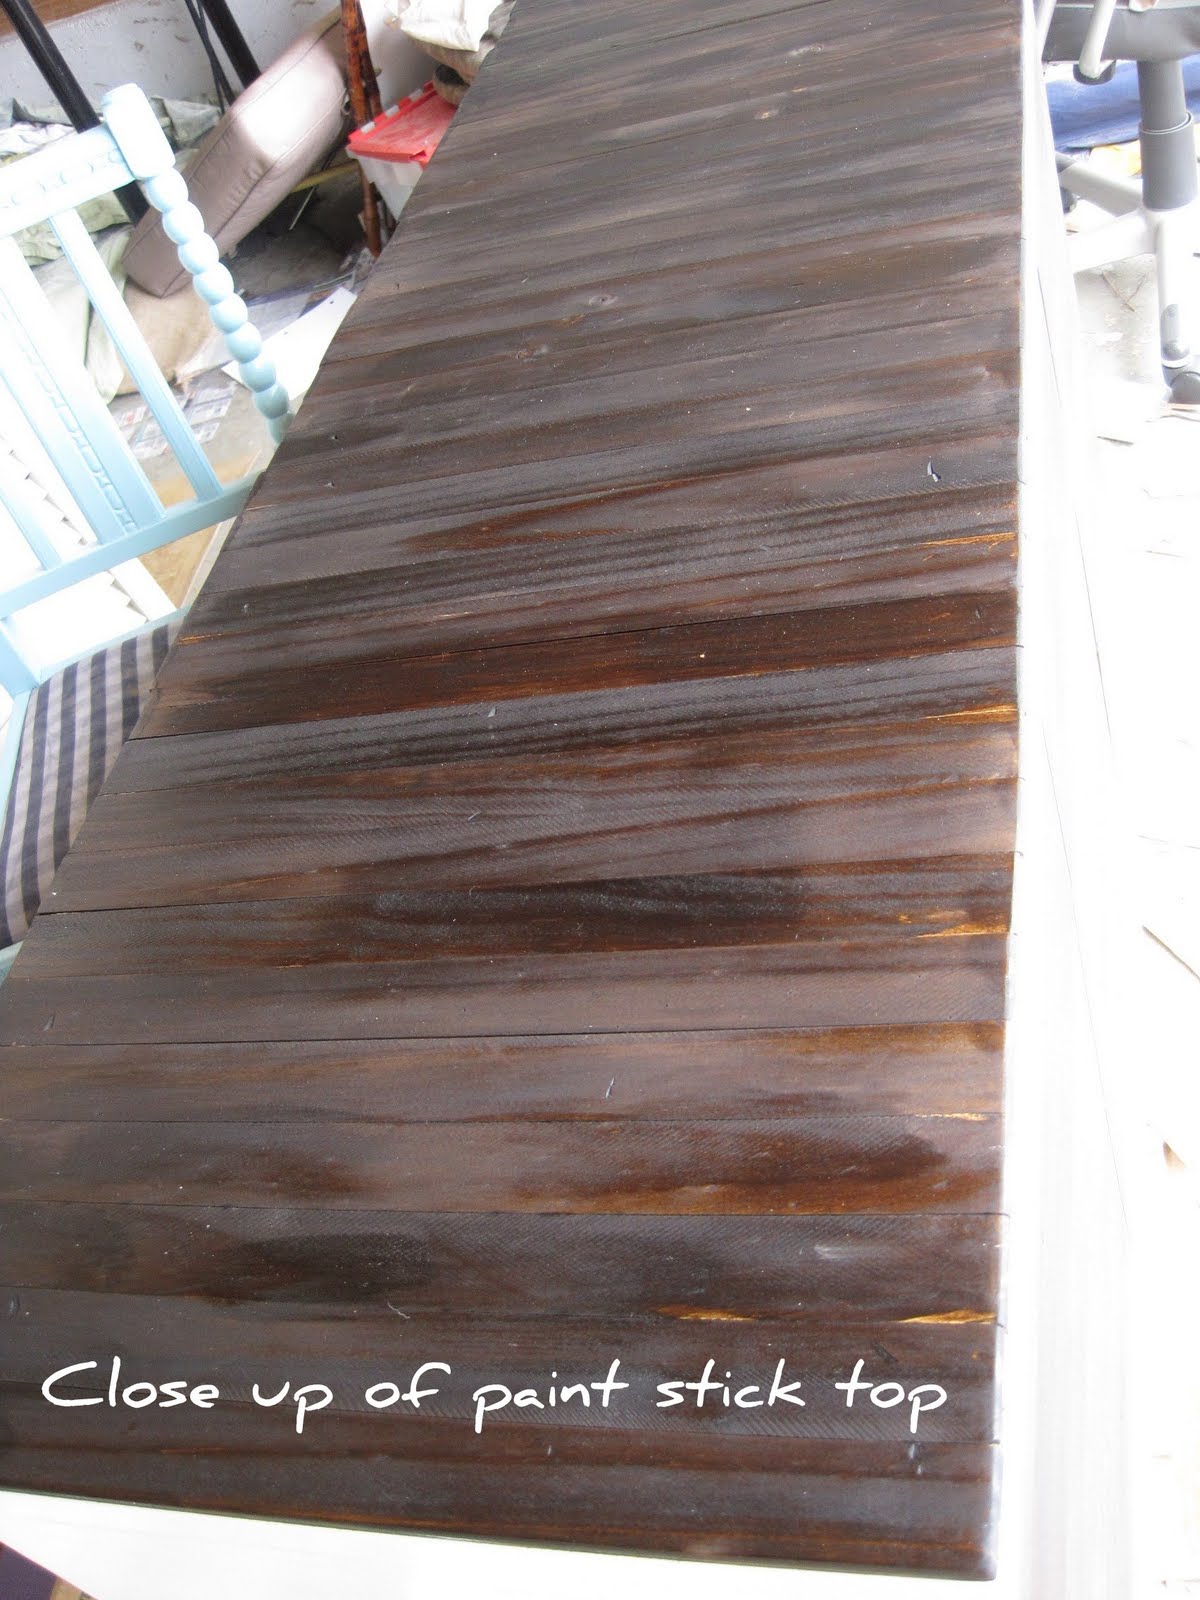
After I stripped ALL the laminate off the dresser on the fronts, top, sides, etc I sanded it all down really well...starting from 80 grit and then 120...so that I had a nice smooth surface to start with. I then put on a thin and even coat of primer on the dresser body but left the top and drawer fronts bare since those were gonna be stained. I didn't take a picture of this step but I just made sure the primer coat was light and even...I prefer Zinser primer...its what Centsational girl uses...and it really does work awesome. Super grippy and smooth looking under the paint. I let the primer dry over night and in the meantime I stained all the drawer fronts with Minwax liquid stain in Dark Walnut. I only did one coat on the drawer fronts...the wood was really pretty underneath and I wanted that to show thru a bit. I then laid out my plank top (paint sticks) and started gluing. There isn't really any rhyme or reason to applying the top. I just drizzled Gorilla wood glue liberally on the dresser top a little at a time (it dries fast) and then put the sticks evenly on the top...making sure that they were smooshed up next to each other completely before moving on to the next one. I also used paint cans to keep them flat during the drying process. As they dry the ends tend to lift a little...make sure you put something heavy on there and really concentrate on keeping the ends flat. Here she is with the unfinished paint stick top..

Cool huh? I really loved it in its bare and naked state but alas...I'm in love with dark stains! So after the top of the dresser was totally covered I gave it a couple days to fully cure before I did the staining. I applied the same Minwax stain to the top. I normally apply stain using a t-shirt or rag but I used one of my Purdy paintbrushes this time to get a thicker and more even application. I LOVE how it turned out. I let each coat cure for about 25 mins before I wiped it off...let it sit for a few hours...and applied the next coat. I did a total of two coats on the top. While the top was curing I painted the sides and front of the box with an oops white paint that I had in my stash.
See the bottom part...well that had a thin cardboard like panel that originally covered it and made it a solid section..but the moisture had damaged that part beyond repair so I simply removed that and sanded down the frame. I LOVE the modern edge it gives the dresser...and its solid wood too so no worries about durability! So this is the box with one coat of paint on it...get ready....I'm about to reveal the dramatic "after" pictures...are you ready? You sure? Ok here you go...


TA DAHHHHH!!!!!! Ok so you guys are probably wondering what I used for my handles on the dresser...well that was kind of a happy accident. I searched all over for modern handles that fit the overall look that I was going for, were cheap, and just happened to have the same width holes that the old ones did. Well I couldn't come up with anything that would work. I was majorly bummed and thinking that I would have to drill new holes and just settle for something that I didn't really love...when I remembered seeing different dressers that people have done that use rope or ribbon in place of handles in the drawers. Well that sparked a MAJOR bonfire of creativity and I remembered that I had a huge bundle of scrap leather pieces that would work AMMMAAAAZING in place of handles....plus they are stiff and will hold their shape well! Yay for using what you already have!! The leather pieces that I have are strips...all the same length so all I needed to do was cut them each in half and use one half for each handle. I widened the holes in the drawers just a tad so I could get the strips (which I trimmed the ends a bit to get it to fit) through the holes. Once I had about 3/4 an inch through each hole I simply folded it flat against the inside of the drawer front and stapled it firmly in place. I did this 9 times...and MAN was it tiring...especially with my kids running around me the whole time! The payoff was HUGE though and I could not be happier with how it looks! Its a little modern...a little funky...and it was TOTALLY FREE! I hope you guys love it as much as I do! I'd love to hear your thoughts!!!

Partying it up @
Furniture Feature Fridays
The Shabby Nest


Funky Junk's Sat Nite Special


All things furniture @ Perfectly Imperfect

Catch As Catch Can