Yummy sign....No really!

I've had a long skinny and totally unfinished cabinet door in my possession for a LONG time and I haven't been able to figure out what to use it for. It dawned on me today that what it was meant to be was a sign. I've been wanting to make a sign that says "Yummy" for my kitchen wall FOR-EVAH and I hadn't gotten around to it. Well this was the day! I started with a blank canvas...since the door was totally nekid...and applied a light coat of dark walnut stain. After about 20 mins I wiped it down and let it dry. After about an hour I took two cans of spray paint...one in Rustoleum Dark Gray and one in Semi Gloss White. I sprayed them both at the same time swirly it around so that the colors mingled together to evenly cover over the stain that I had applied. Once the door was totally covered I let it dry. Once it was totally dry I used a BRIGHT NEON yellow oops paint and dry brushed that speratically over the top of the gray/white color. I let that dry. I then found some letter stencils online and printed out the letters to my word "Yummy". I love the font! I cut those suckers out with an exacto knife and taped them securely to my door with a bajillion layers of paint. I lightly sprayed 3 coats of the white paint over the stencils and then quickly removed them. After they were dry I gave the whole thing a thorough sanding by hand to distress and age the finish. Done and Done! It was JUST what I had envisioned!!! I am in LOVE with this sign!!! It hangs right above my daughter's highchair and looks so stinkin cute. I smile whenever I look at it. If anyone out there wants to tackle this project there are a huge amount of unfinished wood cabinet doors to be had in the As-Is section at Ikea. This sign would also be cute with the word "Eat" on it or maybe "Nosh"...lol jk. I hope you guys try this... if you do please let me know. I'd love to see!!!


When life gives you lemons...

Hey people! Loooong time no see...I know I'm the worst blogger ever and its been forever since I posted last! I honestly have been in a bit of a creative funk lately and just focused on Mom stuff and wife stuff and haven't had much in the way of creative goodness to share. UNTIL TODAY! So you guys may remember the estate clean-out that I did for a friend...well I scored a really beautiful mirror from that same clean-out. The mirror was GROSS and really REALLY big and heavy and it had a chunky wood frame and loads of potential so I hung onto it. And it sat....and sat....and sat in my garage until yesterday when I decided that I had been in a stagnant pool of blah for TOO LONG and I busted out the paint brushes! I originally was going to paint this mirror a suuuper bright yellow oops paint that I scored a while ago...but then decided to go the safer route and do a two toned dry brush look. I stained the frame with Minwax dark walnut first...then waited a whole episode of Dora the Explorer before I rubbed it off! (gimme a break...I'm on toddler time!) After it had cured for a couple hours I dry brushed some white oops paint into all the nooks and crannies and just kinda glopped it on there. I then sanded it to make the white paint look like it was just barely hanging on. I wanted it to look beachy and weathered. So since I majorly suck I don't have a before picture AGAIN...I know...hate me! Well after the frame was dry I stood back to examine my gorgeous new mirror and realized that I now had to clean off the glass...well after a lot of scrubbing I realized that hidden underneath all that gunk was about 5 deep large scratches!!! Yup...sucks to be me! I just refinished a mirror that would not be hanging on my wall. I was majorly bummed but then I remembered that I had been dreaming about having a huge chunky chalk board for my kitchen! If you want to know how to transform a mirror into a chalk board and have it be really durable here's a tip. Prime the mirror first! I painted on a medium thick layer of primer and let it dry first so that the chalk board paint would stick really well. Then I painted two and a half coat of latex chalk board paint letting each coat dry thoroughly before doing the next coat. After all the coats were dry I hung that sucker up! It says on the back of the chalkboard paint can that you should wait about a week before writing on it so it doesn't "burn" the words into the surface. I guess it needs a while to cure so I'm waiting a bit before I write up there. Here she is in all her beachy glory!


Oooh la la I looove it! It doesn't look nearly as big in pictures as it does in person. Its HUGE! What a happy accident! I actually like it way more as a chalk board than I did as a mirror anyway! :) I hope you all have a fabulous week!

Partying it up @

Refinishing a Mid Century Modern dresser part 1

Hey ladies and gentleman! So I was perusing good ol' Craigslist the other day and I happened upon a post in the free section that read "Old dresser for free. Peeling veneer. Bad shape. Come pick it up" Well like any good DIYer out there I was not scared by the words "peeling veneer...or bad shape" I just saw the word "old" and was instantly intrigued! So I called the lady when the post was only about 5 mins old and she told me she'd hold it for me. I went and got it and was smitten by the complete amazing-ness of this dresser. It is not my normal style. Its boxy...and very mid century modern-y. I generally tend to gravitate towards french provincial and similar shapes so I was kinda excited to work on something that was out of my element. The veneer was in HORRIBLE shape. This dresser had apparently sat in the rain for 6 months...and if any of you know much about Oregon...it does in fact rain for 6 months straight. So this dresser got LOTS of abuse sitting in the elements. I knew the veneer could not be saved so I decided to remove it. Here it is in its partially deconstructed state

When all the drawers are shut it looks like it has 9 small drawers but its actually 3 large drawers on the left and 3 small drawers on the right. Super cool!
Check out the original pulls. LOVE!
You will need one of the above if you are gonna tackle a project like this. This tool is about 5 bucks at HD and is worth every penny. It works great at spackling, filling holes, opening paint cans, making small "distress marks" in the tops of tables and such to give it character. It seriously rocks!
So to remove the bottom veneer I just had to basically peel it off..it was falling off and chipping and it was easy peasy to get it off the rest of the way. For the top it was a HUGE pain. I started with the corner and started just scraping at the veneer. Some spots would come off easily and I could grab onto it and peel it the rest of the way...but some spots I literally had to chisel off tiny pieces at a time. It was SO frustrating. This is not a project for the faint of heart! And in one spot my hand slipped and stabbed a piece of veneer into my finger and gave me a BAD cut. That stuff is friggin sharp! So after I started getting a cramp in my arm from all the chiseling I decided to consult my good friend google and see if there was a better way. Google told me to spray the veneer LIBERALLY with white vinegar...let it sit for a few...and then try again. Well it works, but not well. It comes off a tad easier and it comes off in bigger chunks but its still a royal pain in the booty! Unfortunately there is no shortcut to this project.
Ok so now that you are all thoroughly depressed...I'll tell you the good news! I went to HD today to look for a new top for the dresser. I wanted something super thin...maybe wood planks? But I wasn't sure. I looked around and there really wasn't anything that struck me as being good for this project. I kept coming back to wood planks though and none of the wood that they had was the right thickness. I was thoroughly bummed until I strolled past the paint department and spied the paint stir sticks. Hm....(wheels turning)...this is the perfect thickness...and the perfect width...but I would need a TON of these things to cover the whole top of the dresser. Well I had the measurements of the top handy and I compared the length that I needed with the length to one of the SUPER long big daddies of paint sticks. Um ya...PERFECT! The part of the stick that goes in and makes the handle...if you were to cut that part off it'd be the exact perfect length for the dresser top!!!! Cut to me GRINNING LIKE A FOOL! So I sweetly told the paint counter chick what I was planning on doing...I then told her about how perfect those big daddy sticks would be...I then asked her to measure the width of them and tell me how many I would need to cover the whole top of the dresser...Um ya that'd be 62! So I then watched her grab a BOX of big daddy sticks down from the shelf and start counting out 62 of them for me! I could not be more in love with this idea...and HD for making it FREE and possible! I then decided to "sweetly" con one of the lumber guys into cutting all the sticks for me. (probably would've been a good idea to dress a little cuter next time) I finally tracked down a kid in the lumber dept and he was more than happy to cut them all  for me. LOVE him! So the dresser was free...the big daddy sticks were free....the cutting was free...all I had to buy was some wood glue to glue those suckers down and some more Dark Walnut stain. Yup I'm probably the cheapest DIYer ever! Part 2 will show you the refinishing process and how I beautified this beast! Stay tuned people!

Refinished dining table

Hey everyone! Sorry for the lack of inspiring posts lately...I've been sick...like on my deathbed with a pile of nasty kleenex next to me sick! Worst cold in A LONG TIME! I'm just praying that my family doesn't get it. So the one thing that I have done lately (that's worth blogging about) is my dining table re-do. I did a two toned look with a white bottom and a dark stained top (Miss Mustard Seed would be proud...I hope :) I love how this came out...like LOVE! I don't have a proper before pic because I suck...but here's the glamorous after!!!


I stripped the old stain and about 75 layers of chunky polyeurethane off the top and then worked my way from 80 grit to 220 grit with my trusty palm sander. Then I stained the top 3 times with a mixture of Minwax Dark Ebony and Dark Walnut stain. (the combo of both of those is TO DIE FOR...seriously the best color evah!) I let the stain cure for 2 days then poly coated the top 3 times and the base (which was painted with a creamy white oops paint and distressed) 1 time. I love how she turned out! I'm probably gonna sell her because I really have my heart set on a rectangular dining table that will seat at least 6...but in the meantime she sure is pretty to look at. I hope you all have an amazing Easter!!

I'm partying....
Weekend wrap up party @ Tater tots and Jello
Saturday Night Special @ Funky Junk Interiors
Sunday Scoop@ I love naptime with chocolate sundays
One Project at a time @A Bowl Full of Lemons
Nifty Thrifty Tuesday @ Coastal Charm
Anything Goes Party @Type A Decorating


DIY mobile for my baby girl...A tutorial

Hey there! So my wonderful son decided to yank down a cute bright pink paper lantern that I had hanging above my baby girl's crib the other day (how did he reach it you ask? Well he was IN the crib! I promise...I do watch my children...cough cough) He then decided to play soccer with it. Well its paper and paper is fragile. It lasted all of one kick and it was toast. Well I couldn't leave my baby NOTHING to stare at when she's in her crib and I despised all the plastic and ugly ones at the stores. Plus I wanted something unique with random objects hanging from it. I'm weird...I know. Well I needed a round something or other to hang the random objects from so I headed to Craft Warehouse to look for something. I didn't want an embroidery hoop...I wanted something thinner. I found this random gold ring for 2 bucks..perfect!
So when you're making a mobile there are a couple ways you can go about hanging the stuff from it. You can hang them all from around the outside but I didn't want to do that with mine so I created a dreamcatcher of sorts with jute twine. I wrapped one end around the outside and hot glued it securely
I then just wrapped the twine around and across the ring in a pattern that I liked...if there were any large gaps I just wrapped over them.

Once I had enough jute and I liked the look I just cut the end and glued it down securely. I also put a glob of hot glue under each part of the twine as it wrapped around the ring so it was nice and sturdy.
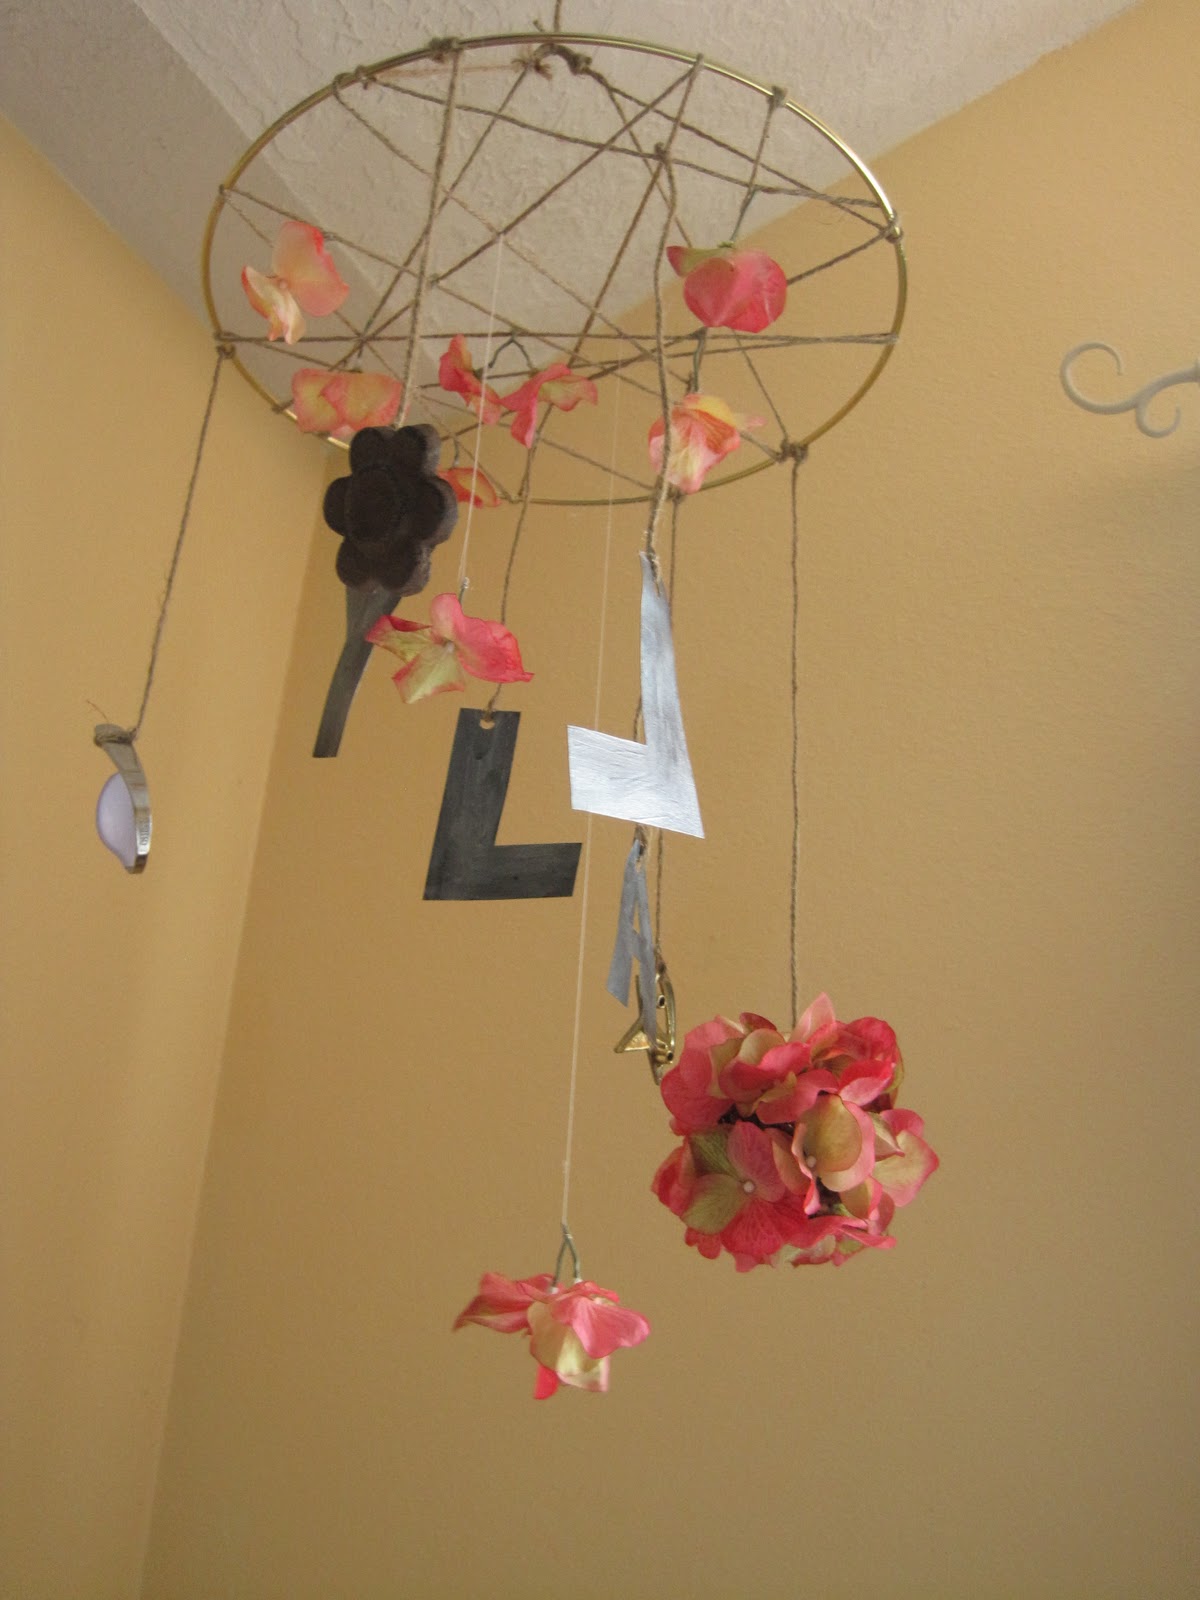
I had a random mish mosh of objects that I wanted to hang from it. I wanted it to be girly but not generic. I had some pinkish fake hydrangea that I cut pieces off and hung from heavy thread from some of the jute, I also had an iron flower that I got for 50 cents from the craft store, I also bent a purple baby spoon into a circle and hung it, I also made some Faux zinc (check out my tutorial) letters spelling out her name (Lyla) and hung them individually, I also grabbed a twig decorative ball and stuffed it with small fake hydrangeas and hung it. Here's the finished product...


I also took small pieces of the hydrangea and glued them into every criss cross point in the jute so it had some sweet decoration. I love how this turned out! I think Lyla likes it too!

I'm partying at....
UndertheTableandDreaming

Natural texture from the dollar bin!

Hey friends! I scored balls of jute garden twine in the dollar bins at Tarjay a couple years ago and I've seriously used it SOO much!! I grabbed about 5 balls of it and I'm just in love with its nubby texture. I used it all the time! I made a jute wrapped vase about a year ago...just like all the tutorials you've all seen on jute wrapped wine bottles and such...but I used an ugly free florist vase. I use that vase CONSTANTLY! Whenever my hubby surprises me with a purty bouquet I plop those suckers in my jute vase. It allows the attention to be on the flowers without looking boring and utilitarian. I just adore it! Well that vase is my bestie and all but I wanted a smaller version for some of the gorgeous daffodils that are literally COVERING my back yard! I have about 5 varieties that our lovely landlords planted last year...you can be jealous...I won't mind! :) Well I was rinsing out an old jar the other day and it occured to me that the jar was the perfect size for the jute wrapped vase I wanted. So into the dishwasher it went and once it was nice and clean I got to work! Here's what I used...
I loved the shape. Its the 16 oz size if any of you want to recreate this look. Its the perfect size for smaller flowers and it holds a lot of water and the mouth is wide so you can cram A LOT of pretties in there!! I'm not gonna give you all a formal tutorial on this because it is brain dead easy...I mean you could seriously be asleep and make this. I almost dozed off making it. Its THAT boring! But the results are Way worth it! So after you've removed the label and washed it thorougly you want to grab your twine and cut the end so its fresh and not frayed. Coat the bottom couple inches in Mod Podge....put the freshly cut end of your jute on the bottom most part and start wrapping it around the jar layer upon layer horizontally (does that make sense?) You want to spin the bottle not the twine..it'll make it A LOT easier to hold it tight so one layer sits on top of the previous layer...you just keep wrapping and wrapping. Every once in a while hold up the bottle and look at the twine...do you see gaps? Then just push it down a little so those are covered and the layers are tight. Just keep going and going and GOING AND GOING. It'll take freaking forever! You'll feel the wrinkles forming as you concentrate on this dumb vase. Once you have all the vase covered ( I personally left the jar part on top uncovered because I liked the look) apply a thin layer of mod podge all over the jute on the outside. It'll also allow you to smooth down all the little hairs that are poking out of the twine. It also makes it water resistant so you can rinse this out and it won't hurt it. Don't put it through the dishwasher or anything though...be careful it doesn't get too wet. Once you are all done and your mod podge is dry you can load er up! Here's mine...

Love it! Isn't that chicken wire basket adorable? Goodwill for a buck! Gotta love those kinda deals! It makes the perfect spot for cute Ikea napkins (why buy ugly napkins when you can get adorable ones for the same price??)  Hope you all like it! I never thought a salsa jar could look this cute!

I'm partying at...
Funky Junk's Sat Nite Special

Anthro inspired faux zinc letters tutorial

Hey everyone! I am certifiably obsessed with Anthropology... as is the rest of the world!! I guess that's where they get the excuse to charge so much... Anyways I was perusing their site the other day and came across these
SWOON! I was IN LOVE with them and trying to scheme how I could justify the 18.00 a piece price tag. Ouch! Especially since I wanted to spell out Yummy on my kitchen wall and that would MAJORLY break the bank! So I started researching DIY ways to replicate these and I came across a couple of great tutorials. I modified them to make it a little easier on myself but the premise was very similar. Here is what you will need...
1 unfinished mdf letter of your choice from the craft store (I wanted to try out one letter first to see if I liked the results...I totally did) mine was 2.00 on sale.
Black spray paint or black acrylic craft paint
Metallic acrylic finishing paint in Oyster Pearl
Sponge brush or small paint brush

Ok here's the process...its simple and I mean SIMPLE to create that look. It literally appears before your eyes in all its shiny metal looking goodness!
Step one-paint your letter black with either spray paint or craft paint...wait for it to dry completely
Step two-paint a layer of the pearl paint over the top of the black make sure that it doesn't go on perfectly...make sure there is some variation in the color so it looks as yummy and distressed as Anthro's.
Let dry...and hang on your wall to be loved and adored by your family and friends!

I am seriously so in love and immediately after I finished my letter I ran around the house looking for other things I zinc-ify! I had some garage sale A to Z bookends that were in the garage waiting for me to get around to them so I added my zinc touch to those bad boys using this same process...

Now run...Don't walk to your nearest craft store and pick up the supplies! You will not be sorry!!! :)

I'm partying at...

Transformation Thursday


Photobucket